Only the best from a bulletin board full of experience in such varied interests as poultry, art, good food, and Ohio history.
Come along on the adventure!

Be sure to also check out ohloveofgeocaching.com for travel and caching adventures!

Tuesday, September 9, 2014

Outgrowing the Box

Backyard Poultry
A Unique Flock
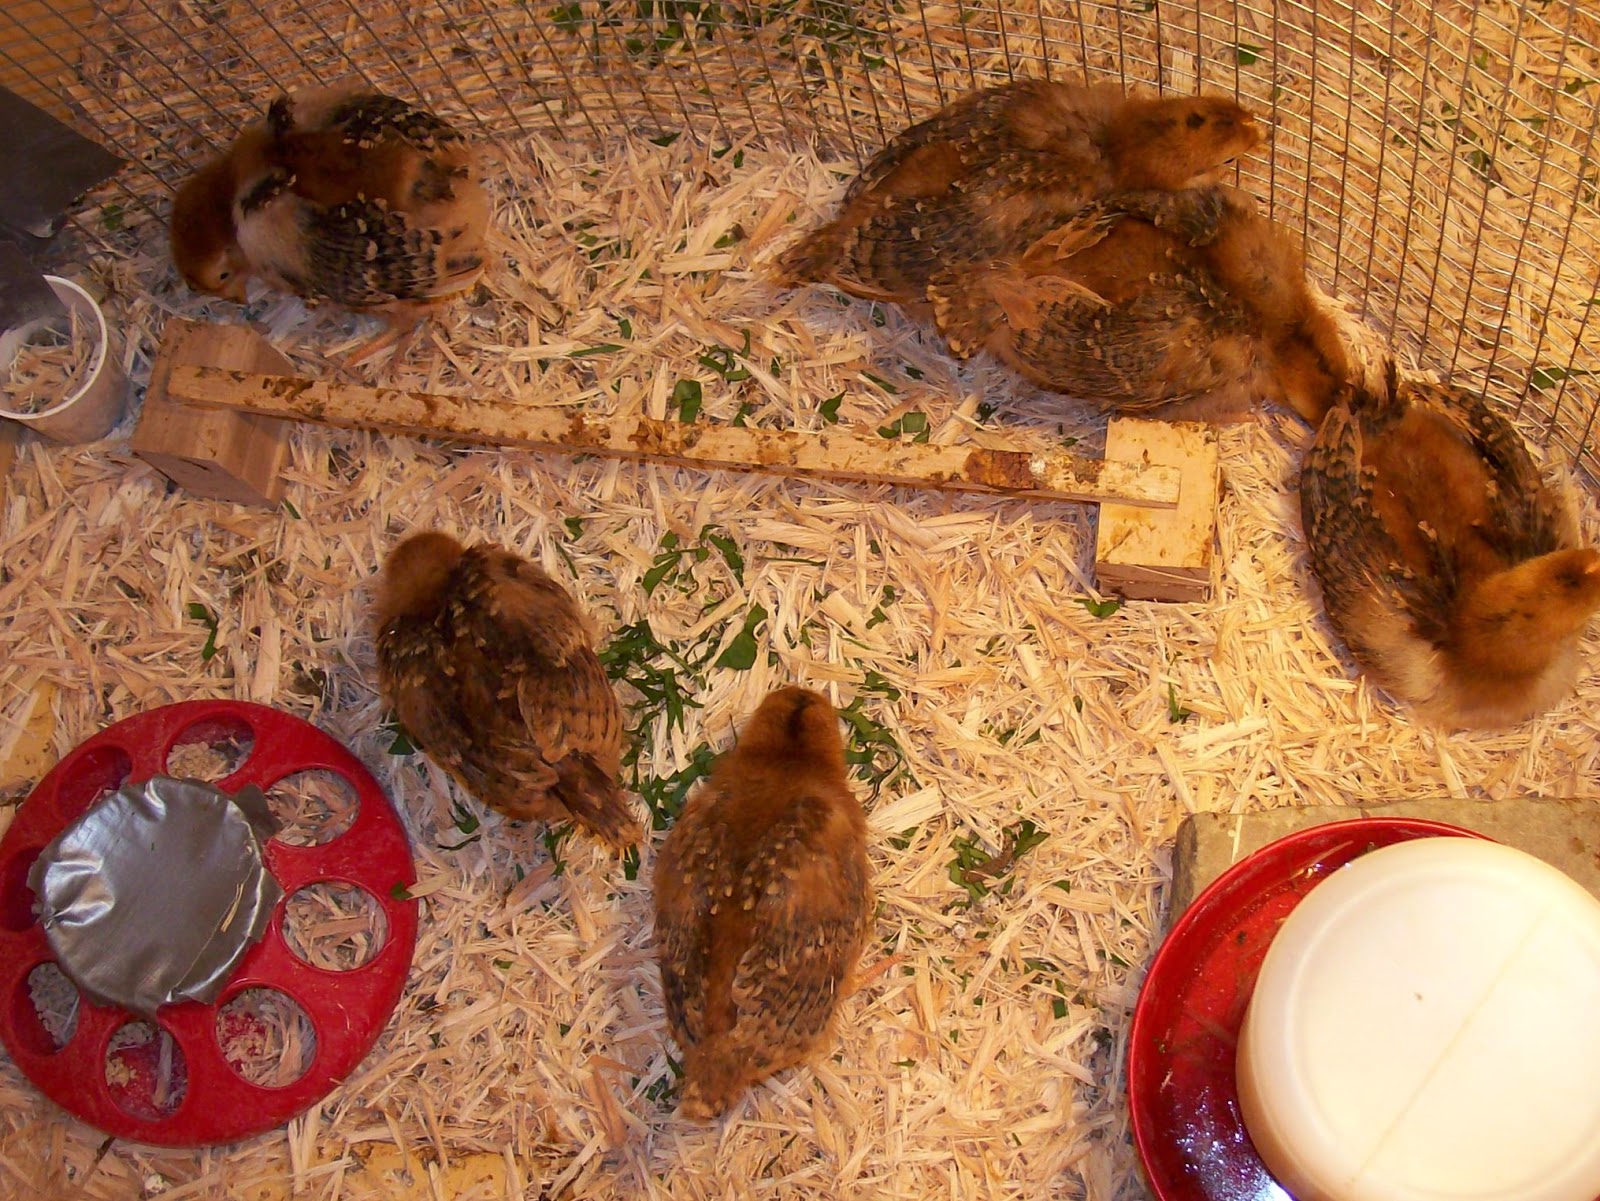
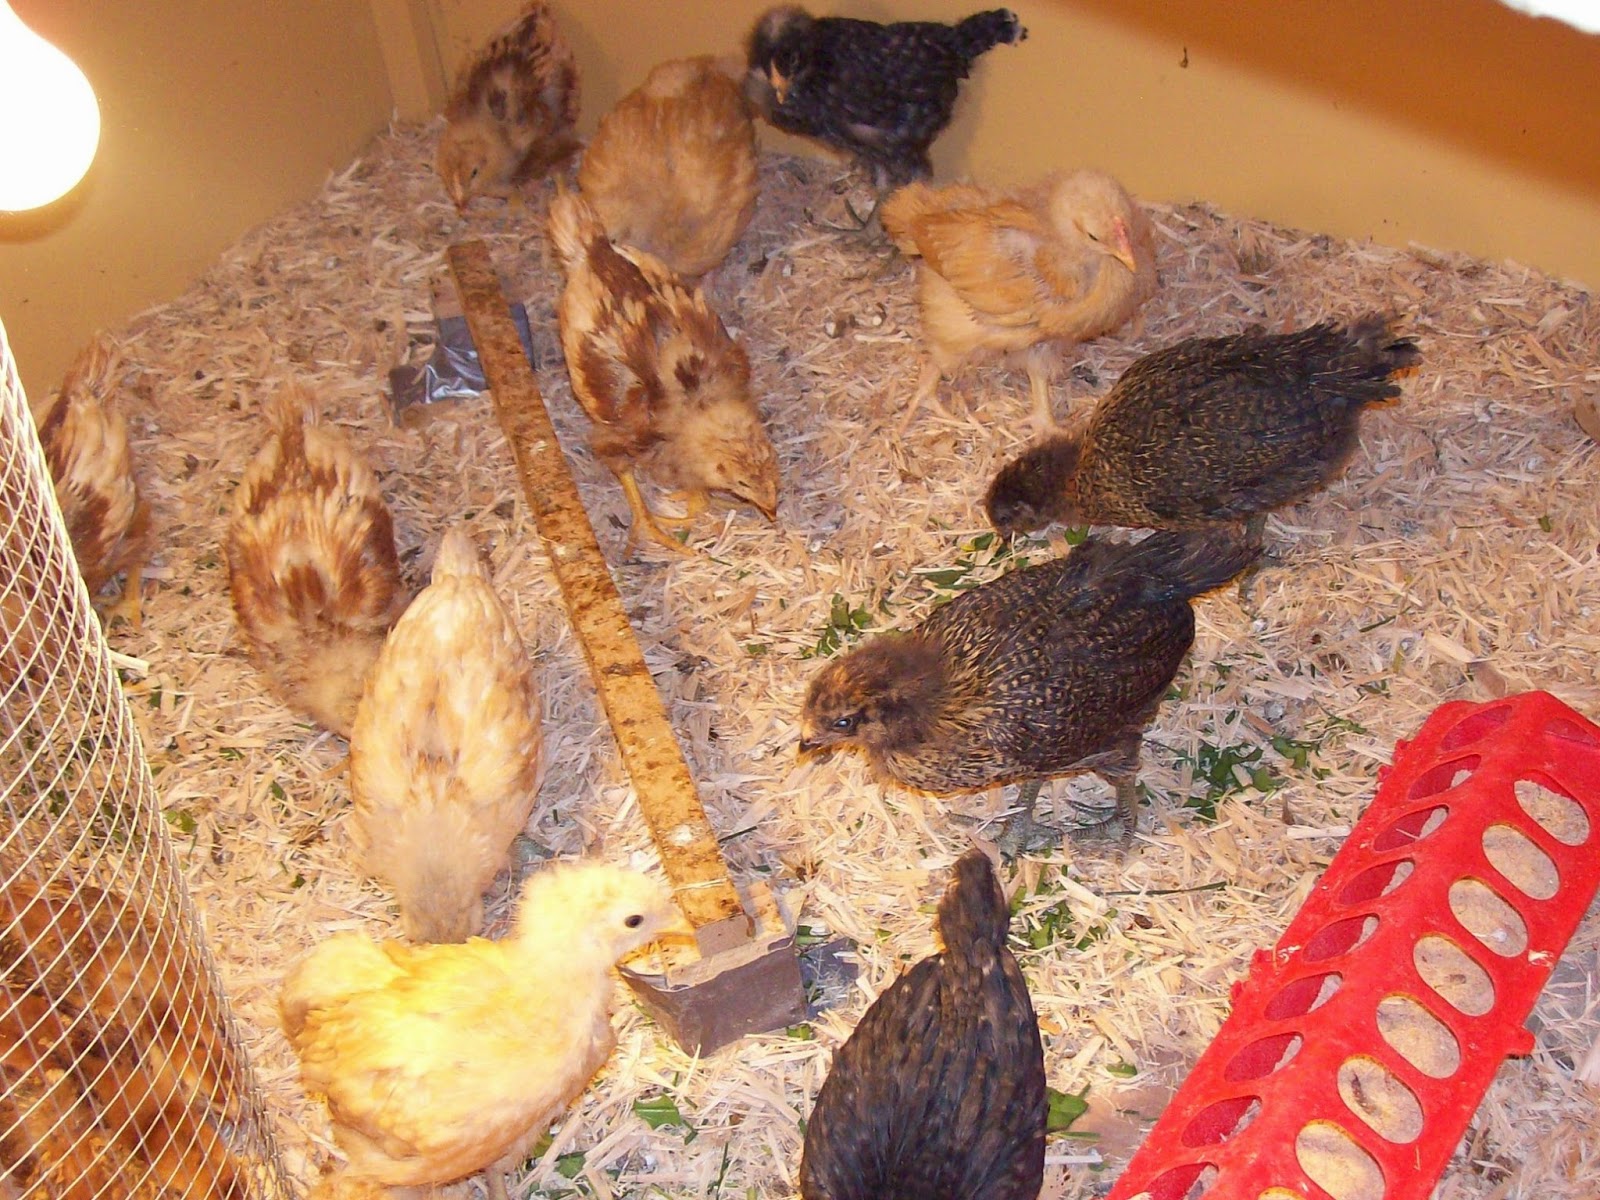
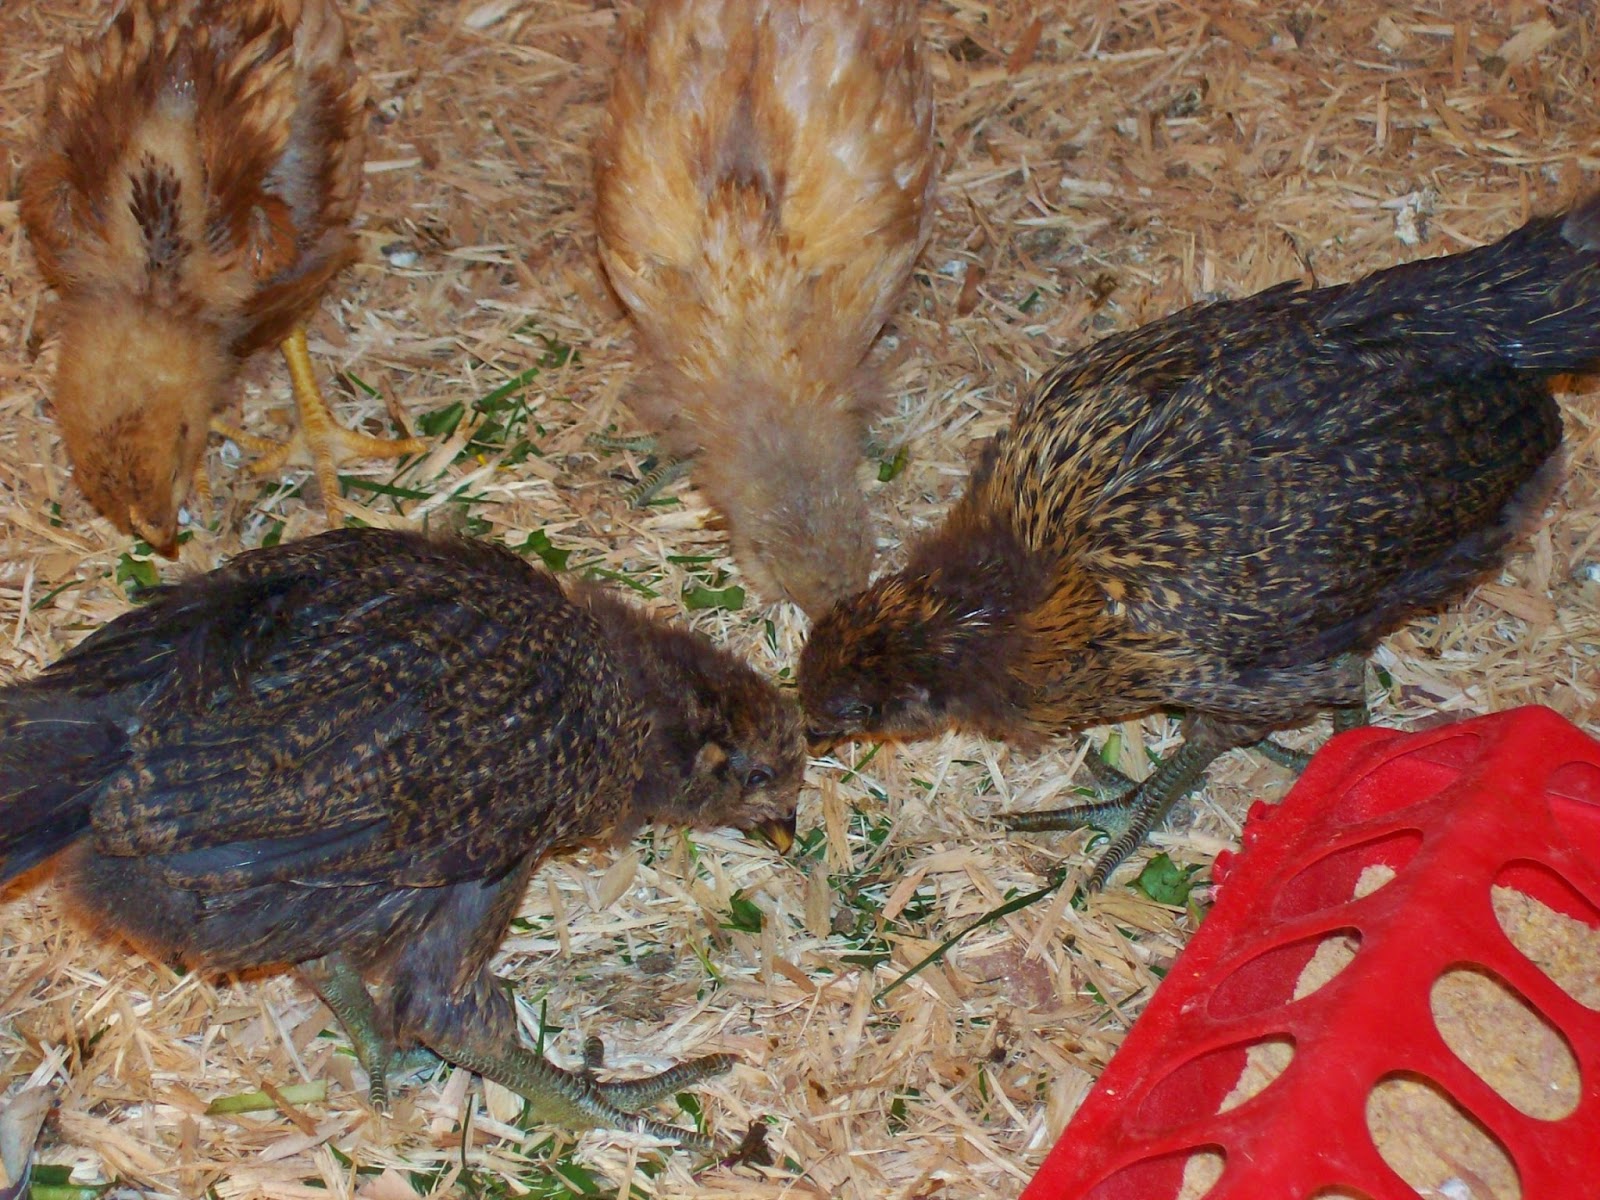
Can you believe how this box has filled up since I brought the chicks home a month ago? Yes, it's going to be time to move them outdoors soon! But aren't they all so beautiful? I'd really enjoyed watching their feathers come out over the last several weeks. Starting at this end of the roost, the Buff Orpington on the outside has turned a golden yellow, while beside it the Golden Buff (totally unrelated breed) is streaked with brown and white. The Barred Rock to the right is beginning to show the white speckles of the adult hen, while down at the end, Birchie the Araucana is a beautiful white. Down on the floor underneath the Buff Orpington is another Araucana, Pinecone, with a beautiful display of gold and black feathers. And spread across the floor in front are the Rhode Island Reds with a character of their own. It is truly a unique flock!

Sunday, September 7, 2014

Little Reds

Backyard Poultry
Playing Grownup
The little Rhode Island Reds were doing their best to act grown up with their older coop-mates. Above, one little chick is trying to take a dust bath in the wood shavings litter! I'm not sure how effective it was. But if you look closely at the Red standing beside it, you can see the whole wing-full of new feathers coming out. You might be surprised at the amount of black and white on what is supposed to be a red-brown chicken. Well, Rhode Island Reds actually can have stripes of black show up in their wing or tail feathers.
Pinecone and Chickie
The older chicks, like I said, almost became like little mothers for the Rhode Island Reds. In this picture, a Red chick appears to almost snuggle up beside one of the elegant Araucanas, Pinecone.

Thursday, September 4, 2014

Raising the Feeder

Backyard Poultry
Lunch Time
As the chicks grew bigger, there were constant changes. Raising the feeder was the first challenge. Having the feeder at floor level worked fine for small chicks, but as they got bigger, they were able to kick large amount of litter into the feeder. This got to be very inconvenient to clean out, as well as wasting food. So I found some small flat rocks and cement blocks to raise the feeder just a few inches off the floor. I also had to remove the hinging top with holes from the feeder (you can see it here) since the chicks' heads were nearly too big to fit into the holes. As you can see, they took full advantage of that fact and shoveled plenty of food out onto the rocks and floor.

Monday, September 1, 2014

Combination

Backyard Poultry
Joining the Roost
Did you spot the newcomer on the roost above? Yes, it's the little brown Rhode Island Red! Finally, it was time to combine the two little flocks of chicks. The Rhode Island Reds had grown big enough that I thought they could hold their own in the older flock. Anyway, they had certainly grown big enough to be very crowded in their little pen. Also, and just as importantly, they had graduated from chick feed to grower feed, and thus could eat the same thing as the larger flock. The chick feed has a higher protein content, needed for the extraordinarily fast growth the chicks experience in the first few weeks of life. At around 3 weeks, they can move to grower feed with a lower protein level. The combination went quite smoothly: the Reds were happy to explore the living quarters they had only been able to see for so long, and the older chicks seemed to take the Reds right in as part of the flock.
Sleepy Time
As you can see, the Reds seemed to fit right in. In fact, they seemed to almost see the older chicks as some sort of surrogate mothers!

Saturday, August 23, 2014

Spotting a Rooster

Backyard Poultry
First Sign of  a Cockerel
Adult feathers were not the only things appearing on the growing chicks. The beginnings of their combs were also beginning to be seen. On most the chicks, all we could see at this point of the emerging combs were tiny pink spots. But there was one Buff Orpington whose comb was much more grown out. As you can see in the picture above, the lobes (that's what the lumps on the comb are called) were already distinctly formed. There's only one explanation for this: the chick is a cockerel (a young rooster). Now, of course, we ordered all pullets (hens) from the hatchery; but, of course, they could not guarantee that no cockerels would slip into the batch. So, it seems, out of the fourteen chicks I received, one Buff Orpington is a rooster. But we will have to wait a bit longer to be sure.

Wednesday, August 20, 2014

New Feathers

Backyard Poultry
Three Breeds
The other chicks' feathers were also growing as rapidly, if not as colorfully, as the Auracanas. Can you identify the breed of each chick above? The one on the far left is a Buff Orpington. Although its head is still covered in fluff, its back and tail feathers are showing the golden color of the adult hen. The Barred Rock in the middle is still mostly black, with only a few white highlights. It will not be until these chicks are much older that they get the characteristic zebra stripes of the adult Barred Rock. Finally, on the right, as well as in the photo below, the Golden Buff is growing a striking mess of feathers.
Golden Buff
It seems these Golden Buff chicks cannot decide between the white feathers of the White Rock and the brown of the Rhode Island Red! You can see the whole range from brown to white in the chick below. The color pattern will definitely change several times before the chicks grow up, and each hen will definitely be unique. That's the beauty of crossbreeds, I guess.

Monday, August 18, 2014

Auracana Lace

Backyard Poultry
Easter Egg Trio
The feathers on the Auracana chicks were especially pretty as they grew out. You can see all three "Easter egg" chicks in the picture above. The two in the front, Pinecone and Walnut, had beautiful gold-brown lace around their heads and necks, with black and gold mottling on their wings and tails. Birchie, the one in the center back, was a complete contrast. Its gray fluff was replaced by striking peach-tan and white feathers. The striped coloring seemed just like the bark of a birch tree. I guess we chose the right name for Birchie! But the darker ones were still my favorites - it looked to me like they'd each been draped with a shawl of gold lace.

Friday, August 15, 2014

Growing Reds

Backyard Poultry
Six in the Bed and the Little One Said . . .
The little Rhode Island Reds, though only a week old, were getting big as well. If you remember, they did not hatch with the rest of the chicks and we had to get them two weeks later (see the story right here). The feathers are nearly all grown out on their wings already, with black, white, and brown crisscross stripes. The chicks were very curious and adventurous. In the photo above, they got themselves all packed onto the roost I put in! Below, the little birds are receiving their first chopped-up grass and dandelion leaves. They caught on right away - they loved to imitate the older chicks next door!
Eating Greens
 

Wednesday, August 13, 2014

Three Weeks Old

Backyard Poultry
Getting Bigger
We had better get back to those chickies - they are growing faster than you can imagine! At three weeks, they were nearly all decked out in feathers instead of down. And at least five times bigger (in my estimation). The chicks did not tire so easily, and spent more of the night sleeping and more of the day moving about. They were still in that discovery stage where everything in the world seemed new and adventurous. They curiously checked out each new delivery of chopped greens I dropped in. And they kept a close eye on their neighbors, the little Rhode Island Reds you can see in the bottom left corner behind the screen. In fact, all the breeds are represented in this photo - can you pick out the Buff Orpington, Barred Rock, Golden Buffs, and Araucanas?

Sunday, August 10, 2014

Pond Trio

Artist's Gallery
A Trio of Three Ponds
Interestingly enough, both of my oil paintings are not displayed together in my house. Mud Valley Reflections joined a number of my Amish country paintings in our living room (Walk in Mud Valley, The Way Home, and Walking Home). On the other hand, Fish Pond Shed found its place in the kitchen in an interesting trio of paintings. It matched my painting Water Lily Lake nicely: though the ponds are different, the colors are the same. I also had another small painting of the same pond as in Fish Pond Shed. You can see it up close below. It was a bit challenging to fit such a horizontal scene into a vertical frame! I really like how the light in the sky and water came out though. And the ripples in the pond - those are especially pretty I think. The farm and shed, well, they're decent enough. Anyway, this painting completed the trio nicely. I was happy to be done with those messy oil paints!
Fish Pond Study

Friday, August 8, 2014

Fish Pond Shed 2

Artist's Gallery
Final Touches
After a little bit more work, my second oil painting was finally finished. Did you think everything was complete on the building in my last picture? Look again. For some reason, I forgot to paint the porch roof post shadows at the same time as the rest of the shading on the building! Well, I had to mix up more paint (which does not exactly match) and put those shadows in. In fact, I still forgot to put them in on the building in the reflection! Oh, well. Then I added some more highlights in the trees, and also along the pond edge. The yellow ochre on the bushes around the pond ties in with the field and adds some interest. I'm actually pretty happy with how it came out.

Wednesday, August 6, 2014

Fish Pond Shed 1

  Artists Gallery
Beginning
Encouraged by the relative success of my first painting in oils, I embarked on another. At this point I was actually taking a class every week in oil painting. So I chose a pretty ambitious picture to try. This scene is actually from the same set of fish ponds, and focuses on the little white shed where the fish keeper stored his fish supplies and feed. For whatever reason, I did not take any pictures until this stage, probably the third layer of oils.

I began with light blue sky, repeated in the water but going down into a deeper blue. The trees were a background of mahogany browns, highlighted in an almost purplish-red on the tree tops. The grass, in turn, came out a range of ochre-tinted greens, with a plain ochre strip midway back. This made for a very interesting combination of colors in the painting, one which I was not too thrilled with. But my art teacher seemed to be happy with the bold use of color, and I went on a painted in the shed. Getting those rooflines straight was something else.

Sunday, August 3, 2014

Mud Valley Reflections 4

Artist's Gallery
Finished Painting
Now for the finishing touches. I was itching to paint the red tree leaves in the front, but I knew I had to completely finish the rest of the painting first. If anything behind was still wet, the tree leaves would get muddy and smudged. First I added a few more highlights on the trees and grass, as well as their corresponding reflections. Next came the cows - and they were not easy to create. Some of them ended up looking more like train cars than four-legged animals! After making sure that was dry, I started in on the tree. It was really challenging since I knew that once I put the paint down, it would be really hard to remove it again! I built up the leaves with dark reds and maroons, then added brighter brick red on top. I think the red tree adds a nice frame on the picture without being too intense for the scene. See what you think of it compared to my watercolor of the same scene right here.

Friday, August 1, 2014

Mud Valley Reflections 3

Artist's Gallery
Adding Detail
After applying that previous layer of paint, I had to wait for it to dry. In contrast to fast-drying acrylic paints (literally five minutes), oils are incredibly slow. I mean, depending on the thickness and type of paint, oils can take from two days to a week to dry completely. It's definitely not a project for an afternoon sitting! While this is a benefit for blending and what not, it can test your patience as you wait to continue the painting. The messy factor can also be an issue, especially if you have to transport the wet painting home in a car! Well, my paint was dry within a week, and I prepared to add more detail to my painting. The barns were done in a grayscale from black to white, with the characteristic blue-green roof. The fence and tiny martin houses were even more difficult, given that I did not have a thin enough brush. They came out in that inexact, country style.

Wednesday, July 30, 2014

Mud Valley Reflections 2

Artist's Gallery
Second Layer
After the first wash of oils had dried, I was ready to continue. I mixed full-strength oils in bolder colors to apply over the corresponding areas of the wash. The grass came out in smooth, brilliant shades of green, and the sky was a mixture of white and light blue. The trees, on the other hand, needed more texture. I loaded a scruffy-type brush with several shades of paint and dabbed it on, blending the leaves into the sky at the top. This is the beauty of oils: because they dry very slowly, you can accomplish a lot more blending. I could paint the sky and half an hour later still blend the tree leaves into it. You can especially see this effect in the grass. I think this blending ability produces a more professional, uniform painting in the end. Another benefit of oils is the brilliant, lasting colors that can be achieved. Acrylics just aren't as glossy, pigmented, or rich.

Monday, July 28, 2014

Mud Valley Reflections 1

Artist's Gallery
Beginning in Oils
Here is the beginning of another painting. Only this time, it's not the same old acrylic paint to which I am so loyal. After much persuasive talk from various artist acquaintances, I finally gave in and decided to try painting in oils. It's much more complicated than it sounds. I pretty much had to buy a whole new set of art supplies: oil paints (of course), paint brushes with oil-resistant glue holding the bristles in, and oil-quality canvas that wouldn't dissolve or become brittle under the oil chemicals. And instead of rinsing my brushes with water, I needed a special turpentine solution that would remove the oily paints. After cleaning my brushes, all the dirty paper towels had to be burned to prevent spontaneous combustion, and wet painting carefully transported home. I soon concluded that oils were, in a word, very messy. But still worth a try.
 
So here we go. To begin, I "watered" the paint down using a special thinner for oils, and applied a wash to cover the entire canvas. I tried to get the light and dark tones placed correctly, even if the colors were a bit off. This is based off a photograph, which I actually used for a watercolor a while back. You can check it out right here, and compare as the painting progresses.

Saturday, July 26, 2014

Apollo 15

Ohio History
Command Module
Satellites were not the only vehicles to enter space. Exploration of the moon set a new goal for the world powers. And it did not end with putting a man on the moon. Tests and observations of the moon continued. This Apollo 15 Command Module, Endeavor, was the fourth of the Apollo missions to land astronauts on the moon. It made its flight in 1971, taking four days to get to the moon and spending almost three days there. The crew conducted experiments and took photographs. The Apollo spacecraft had three major components: the command module, the service module and the lunar module. The service module carried equipment, as well as containing support and propulsion systems; the two crewmen traveled to the moon's surface in the lunar module. They returned to earth in the command module. It measures about 10 1/2 feet high and less than 13 feet in diameter. We read that the size inside is about the same as a minivan - it's hard to imagine traveling through outer space in that!

Thursday, July 24, 2014

Satellite

Ohio History
DSP Test Satellite
Finally, we reached the last section of the museum: space. Space innovation really advanced during the Cold War "space race" of the '60s. Satellites were the first goal, both for spying and for information transmission. The 35-foot-high spacecraft above was a test vehicle for the Defensive Support Program begun in 1970. It was an alert system that could sense thermal radiation from rocket launchers using infrared detectors. This allowed an earlier warning system for imminent missile threats. It was amazing how big it looked in the museum, compared to the pictures we see of satellites in orbit in space. These DSP satellites, as they are called, are still in use today.

Tuesday, July 22, 2014

Inside Air Force One

Ohio History
Cockpit
We got to walk through the Air Force One jet. It was amazing to see how the control panels and cockpit had changed from Roosevelt's plane. It took a crew of 7 or 8 to fly the aircraft. The jet could travel up to 604 mph with an altitude over 43,000 feet. Up to 40 passengers or more than 10 tons of cargo could be carried at a time. Compare this to spending days riding in a horse and carriage to even get across the country. Now the President could travel halfway across the world in a matter of hours!
Air Force One Accommodations
This plane saw a number of historical moments take place. It carried President Kennedy to Berlin to make his famous speech in 1963. Following President Kennedy's assassination in Dallas, Texas, Lyndon B. Johnson took the Oath of Office in the plane. There was not time for him to return to the White House, for America was without a President. Air Force One also carried President Nixon to China on his historic 1972 diplomatic visit. And in 1983, British Queen Elizabeth II flew on the plane during her visit to the United States.

Sunday, July 20, 2014

Air Force One

Ohio History
SAM 26000
Now we'll jump back to the Presidential Gallery, and the first jet built specifically for Presidential use in 1962. It carried eight US Presidents over three decades, from President Kennedy to President Clinton. The jet's official name was SAM 26000, which stood for "Special Air Mission," number 26000. The call sign "Air Force One" was also used when the President was on board to make sure everyone knew where the President's aircraft was. Because President Kennedy did not give the plane a nickname like previous Presidential aircraft, the media also began to call it Air Force One. The name stuck. Check out my Roosevelt's Plane post right here to see a side view of SAM 26000 as well - it wasn't easy to photograph these big planes!

Friday, July 18, 2014

Berlin Air Lift

Ohio History

Candy Drop
After "entering" Berlin through the checkpoint in my last post (here), we walked through a hallway lined with life-size scenes from the city and era. This was my favorite scene - German children climbing up to get a parachute from an airlift drop snagged in a tree. More likely than not, it contained candy! The Berlin Airlift dropped lots of candy for the city's children, as well as daily groceries, medical supplies, and even newspapers. But more than half of the total tonnage brought in was coal. Supplies were shipped to the European coast on freighters, then carried by train and truck to the airports to be loaded on planes. I read that they even brought a baby camel named Clarence to Berlin on one of the flights!

Wednesday, July 16, 2014

Cold War Conflict

Ohio History
Berlin Checkpoint
The Cold War conflict was expressed in a number of ways around the world. One of the first major face-offs was in Berlin, Germany soon after the post-World War II partitioning. As Britain, France, and the US prepared their sections of Berlin for a democratic self-government, the Soviet Union resisted. It cut off all ground travel to and from the city in June 1948. Unwilling to risk starting another war, the western powers began a 464-day airlift to supply West Berlin with fuel, food, and supplies. The Soviets finally lifted the blockade in May 1949, although the Berlin Airlift did continue until September. More about that in my next post.
Satellites & Missiles
The arms race was another facet of the Cold War conflict. The Air Force Museum displayed a number of satellites and missiles from the Cold War era. Fear and suspicion played just as big a part in the arms race as actual threats. Satellites for space reconnaissance were developed to scope out the armaments of the other side, especially missile development. They could not be shot down over enemy territory like planes, although much more powerful cameras were required.

Sunday, July 13, 2014

Cold War Planes

Ohio History
Post-WWII Planes
Moving on in history, we saw a number of planes on display from the Cold War era. Many were reconnaissance planes used to gather information about Soviet air defense radar systems. Pilots would fly along (and sometimes over) the border of the Soviet Union and other communist nations behind the iron curtain to spy on their technological capabilities. They traveled at night, maintaining radio silence and taking pictures with powerful cameras. The world's largest aerial camera ever built was on display in the Cold War gallery. It produced an 18"x36" negative and could detect a golf ball from an altitude of 45,000 feet.

Wednesday, July 9, 2014

Roosevelt's Chair

Ohio History
The Lift
President Franklin D. Roosevelt's plane also had the distinction of being the first airplane specifically built for Presidential use. I was still in the aircraft when I took this picture, looking down into a hatch opening in the floor of the plane. Since he was a victim of polio and unable to walk, President Roosevelt could not board the plane easily. This elevator allowed him to remain in his wheelchair and be lifted comfortably into the plane, rather than being carried up the stairs. You can see the chair ready and loaded into the lift. Roosevelt traveled to the Soviet Union in this airplane to meet with Allied leaders in 1945. It must have made headlines all across the country!

Monday, July 7, 2014

Roosevelt Plane

Ohio History
Presidential Gallery
Of course there were a number of planes used during World War II on display at the museum. This new form of high speed travel allowed this war to affect more civilians than perhaps any war in history through bombing. But the plane from the WWII era that interested me most was one used by President Franklin D. Roosevelt. It was located in the Presidential Gallery, which we accessed by riding the shuttle bus across the base. This gallery boasted the world's largest collection of planes used by U.S. Presidents, including four that we could actually get inside. President Roosevelt was the first President to fly while in office in 1943 (imagine that - it took forty years after the first flight to get a President in the air!). His plane is the silver one in the background of this picture; it was nicknamed The Sacred Cow.
Cockpit
We got to walk all the way up and down through the narrow passages of the plane. Here is a view of the instrument control panels surrounding the pilot's and copilot's seats.

Thursday, June 26, 2014

Bell Helicopter

Ohio History
Tilt-Rotor Aircraft
Next, we got to see the world's first 'helicopter plane'! Yes, this aircraft combined all the good points of a helicopter and an airplane. It could take off vertically and hover like a helicopter, while traveling at the high speeds of a plane (up to 184 mph!). It used propellers for vertical lift to take off, then turned the propellers forward once in the air to provide thrust. I think that this is why it's called a tilt-rotor aircraft. The first-ever tilt-rotor flight took place in 1958. However, after this, the plane was put on display in a museum, and the project was dropped. We never found out why . . . I guess they just missed the runway too much.

Tuesday, June 24, 2014

Civilian Planes

Ohio History
Curtiss Jenny
The purpose of this plane, the Curtiss Jenny, was mainly pilot training during World War I. The aircraft was used both for basic flight training and for bomber training. More than 6,000 of these planes were manufactured before the end of the war. Many of the surplus aircraft were sold to civilians after the war and used throughout the 1920s and 1930s. This was the first time airplanes were widely available to the public, and began widespread civil aviation. In fact, stunt pilots used them to perform tricks in the sky, either solo or in groups, known as the 'airplane circus.' The planes were also used to sell airplane rides to civilians. They would traverse the country, spending a couple days in a farmer's field before moving on.

Saturday, June 21, 2014

Bigger Planes

Ohio History
WWI Plane
 We moved on to the Caproni Ca. 36 used during World War I. Already, planes were changing the landscape of war and the destruction it could cause. The WWI planes were designed by an Italian named Caproni and used in the U.S., Great Britain, and France. As you can see, this one has a larger engine area, carries more bulk overall, and also has a water-cooling engine system. Maximum speed had now reached 87 mph, and altitude up to nearly 15,000 feet. This plane was used as a bomber, and soon was laying waste to Austrian cities in a faster and more deadly manner than yet seen in history.

Tuesday, June 17, 2014

New Planes

Ohio History
1911 Flyer
Although I'm not for certain, I believe this is the second plane which the U.S. Army purchased, a Curtiss Model D. It was one of the five planes ordered by the military in 1911. Several of its highlights were easy disassembly for transportation, speed up to 50 mph, and flying time up to 2 1/2 hours. The propellers were mounted in the back rather than the front, a deviation from the Wright design, and the control system was also different. The museum built the replica above in 1987, based on early photographs of the actual plane, which was scrapped.
Piece from a Wreck
This broken airplane piece reminded us of the many dangers involved with early air travel. It came from the first fatal airplane crash, in the Wrights' 1908 Flyer. One of the propellers malfunctioned, and the plane crashed hard to the ground. Orville Wright, the pilot, was hurt seriously, while his passenger was fatally injured in the wreck.

Saturday, June 14, 2014

Wright Plane

Ohio History
Wright 1909 Flyer
This life-size reproduction was the next plane we found on display in the Early Years Gallery. It was built in 1909, already improved-upon from the original Kitty Hawk planes. This craft could stay airborne for up to an hour, and reach speeds of 42 mph--amazing for that time I'm sure. Sadly, it was also the first plane used by the U.S. Army, which purchased it for $30,000 in 1909. Thus began the development of military aircraft. Wilbur Wright actually used the plane to give flying lessons to several new pilots. It remained the only army plane in use for almost two years, when it was retired after several crashes and repairs.

Tuesday, June 10, 2014

Air Force Museum

Ohio History
Planes
Ready for another sight-seeing jaunt? Guess what . . . we are still in Dayton! I know what you're thinking: how can there be more to see besides the Wright Bicycle shop, Dunbar House, Booneshoft Museum, Patterson House, Wright-Dunbar Interpretive Center, Carriage Hill, and even Possum Creek Metropark? I know, I've dragged you all over Dayton, but I promise, this is our last stop for now! Besides, this is a place you won't want to miss: the National Museum of the US Air Force. This museum boasts almost 750,000 square feet of display area filled with all kinds of once-airborne machines (or replicas of them). Displays span the entire history of aviation, from the first flight to modern satellites. On top of that, the museum is said to be the largest and oldest military aviation museum in the world; it first opened in 1923. It has continually expanded from its the 8100-foot area then to more than 17 acres of indoor displays now. The plane above hung in the Early Years Gallery, which was our first stop at the museum.

Wednesday, May 28, 2014

Banana Bars

Gluten-Free Gourmet
Snack Time
Here is that moist, sweet, chewy snack for a day when you just need a yummy bite to eat. And, of course, it's still gluten and sugar free! These banana bars are a notch up from regular banana bread, with a delightfully smooth texture and sweet flavor. But the best part is that they're so easy to make. Here's how:
Cream together:
1/2 c. softened butter                                    1/2 c. raw honey
2 eggs                   1 c. sour cream                   1 t. vanilla extract
In a separate bowl, mix well:
2 c. sifted oat-rice flour                  1 t. baking soda           1/4 t. salt
Add the flour to the butter mixture, then stir in 2 mashed bananas (about 1 cup). Spread in a greased 9x13 pan (or a similar size - we used a foil pan for extra-easy cleanup!). Bake in a 350 oven for 20-25 minutes, or until lightly browned on top.
Ready to Bake
Once the bars are cool, we spread a light frosting on top. It was simply delicious!
Beat well and smooth over bars:
1/4 c. softened cream cheese                         1/4 c. softened butter
2 t. vanilla extract                             1/4 - 1/2 c. raw honey
Once you taste these, you'll want to keep them around all the time to grab for a quick snack or even breakfast. These banana bars are a real treat!

Saturday, May 24, 2014

Full Buffet

Backyard Poultry
Fourteen Hungry Mouths...
But if there's one thing all chicks do--no matter the age--it's eat. I mean gobble like they'd been starved for a week. Well, I do admit to having forgot to fill the empty feeder for maybe an hour. But just an hour! They were storming the food trough before I'd even put the lid back on! I guess I had never thought about how much time a chick spends eating before. Meanwhile, the little ones were gobbling from their own food bowl (I must have let it run empty, too):
And the Little Ones
Well, we will leave these chicks to eat and grow for a while. This concludes the current series on chicks. It also, by the way, completes post #500. It's hard to believe I've published five hundred posts already--and that nearly three whole years have gone by since the Best of the Bulletin Board was begun!

Thursday, May 22, 2014

Six Little Peeps

Backyard Poultry
All Set Up
And so, the six little chicks settled into their new home. They got their roost right away, as you can see, although they've not tried it out yet. I had to improvise for a feeder, since another trough feeder would be much too large. This one was supposed to have a tube on top to feed the food down. However, the tube tends to keep the food level much too high, and causes a lot of food to overflow into the litter. So I removed the tube and just filled the feeder manually when it ran out. Of course, I had to cover the top with duct tape so the chicks wouldn't roost on it, though it doesn't look like it's helping much. The quart fountain waterer was just the right size for these little peeps, propped on a rock to keep litter out of it.

Tuesday, May 20, 2014

Coexistence

Backyard Poultry
Moving In
Relations between the ducklings and chicks quickly declined (as well as my sister's tolerance of the situation), and after the first night I was obliged to find something else to do with my six little birds. I revised the set up in the big chicks' box, and found a workable solution. I added a second light bulb (only a regular lamp bulb rather than the infrared brooder bulb) to create enough heat. And I used half-inch hardware cloth to separate the two ages of chicks. You see, the younger ones needed to grow a bit before facing the big chicks. Besides the heat needs issue, the older birds were apt to see the little ones as animated toys to chase and peck. Not a good situation! A few weeks should cure that problem, though.

Monday, May 19, 2014

Latecomers

Backyard Poultry
Six New Chicks
The Rhode Island Reds have arrived! Remember in my previous post (see it here) I described the chick mix-up? The original ten Rhode Island Red chicks I ordered did not hatch in time, so they sent Golden Buffs instead. I took four Golden Buffs and reordered six RI Reds. And, two weeks later, here they are. This is how they looked on arrival--obviously already a couple days old since their wing feathers are growing out like crazy. They seemed to have already been started on food and water as well.
Temporary Room Mates
I stuck them down into the older chicks' box, but soon realized it wasn't the best idea. The one brooder light was not enough to keep both sets of chicks warm. But happily enough, my sister had also just received two little ducklings in the same order as the RI Reds. They were set up in the kitchen under a warm bulb. So in went the chicks with the two yellow ducklings for their first night. They got along pretty well, except that the ducklings liked to lie around and the chicks kept stepping on them.

Saturday, May 17, 2014

Little Auracanas

Backyard Poultry
Pinecone . . . or Maybe Walnut
Ready to see some more feathers? Here are the 'Easter egg' chicks, the Araucanas/Americanas (I'm not sure which), that lay blue eggs when they grow up. I had two of the dark chick above named Pinecone and Walnut. The new feathers are lined with tiny rings of black and gold, in contrast to the all-black fuzzy down. At about two weeks of age, these beautiful feathers were already covering the wings and tail and starting on the back. But their little heads were still brown! That would disappear in time as well though.
Odd One Out
This is Birchie, the third Auracana. It was definitely the odd one out, with coloring completely opposite of Pinecone and Walnut. The new feathers are an off-white with tan at the bases. This was the coloring Birchie always kept. The old down fluff looks quite drab compared to the new feathers on the shoulders, wings, and back.