Only the best from a bulletin board full of experience in such varied interests as poultry, art, good food, and Ohio history.
Come along on the adventure!

Be sure to also check out ohloveofgeocaching.com for travel and caching adventures!

Sunday, April 29, 2012

Darby Creek 2

Artist's Gallery
Second Layer
Now I am adding some more darks to build up those base colors. The reflection is very brown because of the muddy water, and the strokes go straight down, even though the creek is angled. That somehow gives it a wonderful flowing feeling. And it's a breeze to just paint over that tape! It's funny, several people who saw me painting thought at first I had painted the railing blue!! I’m also really working up the range on the trees, from fluorescent yellows to black greens and turquoise and sea green in between. The most important thing you can do for trees is to have definite darks and lights—and in well-shaped clumps, not little dabbles. I discovered that fact on this picture—and stopped hating painting trees so much!

Saturday, April 28, 2012

Darby Creek 1

Artist's Gallery
Darby Creek from Bridge at Prairie Oaks
On the long walks my family used to take at our local park, this spot was always a shady place to slow down and rest after the hot, sunny trek through dull prairie grass. That feeling inspired me to begin a painting from this photograph I took there, looking down the Darby Creek. It seemed like a pleasing composition, the evening sun giving the trees a sharp glow behind the railings, but I decided to pep up the color a bit. So...here goes!
Blocking In
This is called the underpainting: Using basic darks and lights to define the basic shapes and locations of things. I did that excellently on the bank of trees, and I think the painting owes a lot of its success to it. The colors at this point aren’t very accurate, but the relative values are. And don't worry, the bridge isn't going to be blue! I put the painter's tape on to keep from painting on the railing on the initial background stages. It worked very well—gave the bridge sharp, clean edges.

Wednesday, April 25, 2012

String Pie

Gluten-Free Gourmet
Spaghetti String Pie
As you can probably guess, spaghetti squash is somewhat different from other squashes. Gluten-free spaghetti, when you can find it, is still pretty high in sugar, so this squash makes a great substitute. However, it’s also delicious on its own, such as this recipe.
First let me explain the easiest way to cook spaghetti squash. Cut the squash in half lengthwise, remove the seeds, and place halves upside down on a baking sheet filled with a half inch water. Bake it at 400 for 30-45 minutes, depending on squash size, til flesh can be pierced with a fork. Remember to keep checking the water level and refill as needed! Once cool, tease the squash strands out of the skin with a fork.
Now for the String Pie. First, we’re going to do some frying. Heat in a small saucepan:
2 T. butter            2 t. chopped garlic                       3 dried tomatoes, chopped
1 t. each: dried basil, oregano, and marjoram,
OR fresh basil, thyme, oregano, or parsley, chopped, if you have them
Once fried and savory, add 3/4 c. of water and simmer with the lid on til the liquid has reduced and the tomatoes are soft. Set aside to cool. Toss gently in a bowl:
3 c. cooked spaghetti squash                        3/4 c. shredded cheddar cheese
1/2 t. salt                                            Tomato mixture  
1/2 c. breadcrumbs (or flour cut into a tablespoon of cream cheese)
Bake in an 8” dish at 375 for 25-35 minutes. Serve warm. Garnish with tomatoes or peppers.

Tuesday, April 24, 2012

Souffléd Sweets

Gluten-Free Gourmet
Sweet Potato Soufflé
Here is another way to eat sweet potatoes that replicates that marshmallow-casserole taste (without the super-sweet marshmallows). The bit of extra work is well worth it.
First, beat together:
2 sweet potatoes, cooked and mashed (or one large can)
2 T. apricot jelly          1/4 c. honey               1/2 t. vanilla    
1 T. butter, softened                        1 t. cinnamon
Separately, beat 5 egg whites until stiff peaks form. Gently fold into the sweet potatoes. Bake in a 9 x 9 casserole dish at 350 for 30 minutes, or til lightly browned on top. Serve immediately (or else egg whites will fall). This dish would almost pass off as dessert!

Sunday, April 22, 2012

Yummy Yams

Gluten-Free Gourmet
Mashed Sweet Potatoes
I used to think the only way to eat sweet potatoes was a baked casserole of canned yams with marshmallows on top. Surprise! Sweet potatoes are very versatile, go well with a variety of flavorings, and can taste better than straight out of a can! This simple recipe brings out a savory flavor in the yams.
Fry 3 T. finely chopped onion in a medium pan with 2 T. butter and 1 T. honey. Put on low heat for 10-15 minutes until caramelized. Add and stir to heat: 
4 T. cream cheese                      1 t. salt                          2 T. butter
      1/2 t. each: basil, marjoram, oregano    
3 c. sweet potatoes, cooked and mashed (or 1 large can)
Serve immediately; eat like mashed potatoes.

Saturday, April 21, 2012

Butternut Bake

Gluten-Free Gourmet
Ingredients
Sweet and creamy is another way to eat squash, and it suits butternut especially well. This dish tastes almost like pumpkin pie; adjust the spices for your taste.
First, cook a medium-size butternut squash, scrape out of the skin, and mash (see instructions here). Take about 3 cups of cooked squash and beat it with a mixer til silky smooth. Add and beat well:
1/4 c. honey                   1 T. butter, softened                          2 eggs
2 T. soft cream cheese                  1 t. vanilla                           1 t. cinnamon
1/4 t. each cloves & nutmeg                           1/4 c. water
Squash Pie
Pour into a small greased pan (we use a 2-quart round dish) and bake at 350 for 30-40 minutes, til it’s browned and set like a firm pudding. Serve warm or cool. Try topping with whipped cream or graham crackers if you like.

Friday, April 20, 2012

Squash Crumble

Gluten-Free Gourmet
In the Oven
Squash can be a great asset to any meal: it’s low in sugar, high in fiber, and rich with nutrients. The only question is...how do you fix it? May I suggest a few recipes that our family loves...you can’t even tell it’s squash! This acorn squash crumble has a delightfully sweet, roasted taste. Combined with the crunchy crumb topping, it’s a real winner!
First, cut a large acorn squash in half, scrape out the seeds, and chop roughly into 1” pieces. Toss in a bowl with 3 T. canola oil, 1 t. salt, and 2 t. dried marjoram.
Place in a buttered 9x9 casserole dish and sprinkle 
a couple tablespoons of dried sage and fennel on top.
Last, cut 3/4 c. oat/rice flour into 1 T. butter and 4 T. cream cheese to make breadcrumbs. Sprinkle evenly over the squash.
Acorn Squash Crumble
Cover the dish with foil and bake at 400 for 40 minutes. Then remove the foil and bake it another 10-15 minutes, til the squash is soft and the topping golden brown. Serve nice and hot.

Thursday, April 19, 2012

Arboretum Bridge

Ohio History
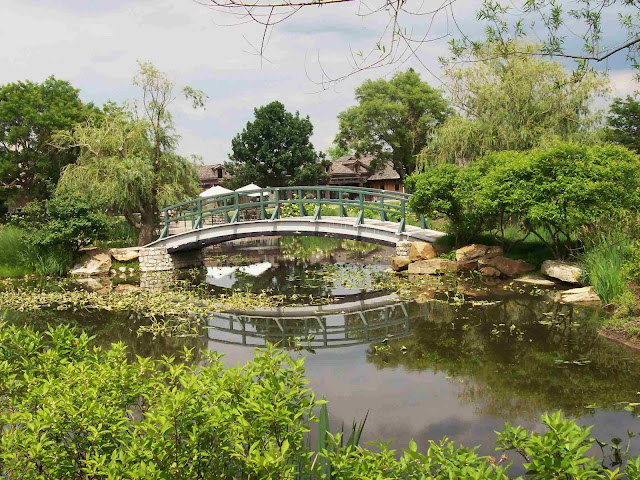
Water Lily Pond
Did you recognize this bridge? It’s a reproduction of the Monet Bridge from the French artist’s famous paintings. I’ve never been to the real one, but this looks pretty realistic to me! It’s even surrounded by lily pads. In the background is the Zorniger Education Center (that’s right—I found it in the brochure…), a sort of nature center/gift shop. The arboretum gives horticultural programs, hosts special events, and has an annual native plant sale. Cox Arboretum turned out to be more than a regular metro park—an interesting place!

Wednesday, April 18, 2012

Arboretum Gardens

Ohio History
Yellow Lilies
This beautiful bunch of lilies grew in one of the arboretum gardens. There were nine theme gardens in the park, featuring all kinds of shrubs, wildflowers, edible plants, conifers, and several vine-covered arbors. There was even a shrub maze for children formed by 1,175 boxwood plants! My favorite was the rock garden, where a stone path lead over a gurgling stream with unique rocks and plants.
Rose
A rainbow of different roses was planted in yet another garden area. Most of them were old and wilted but this one was still pretty. There’s just something about photo—almost seems like you could reach out and touch it!

Tuesday, April 17, 2012

Cox Arboretum

Ohio History
Arboretum Lake
Spring is a beautiful time to visit local parks and gardens, when trees are freshly leafed out and flowers are blooming. A couple years ago we spent a spring afternoon at the Cox Arboretum MetroPark near Dayton. The park is 189 acres, mostly forests and meadows with a couple miles of hiking trails. It also has a variety of special gardens and several lakes and ponds. We saw this lake on our walk through the gardens—it looked so quiet and still.

Monday, April 16, 2012

Green Armchair

Do-It-Yourself Decorating
Another Chair?!
I just thought I should show you the third chair for the living room as well (though we didn’t recover it or anything). It’s a more comfortable—and larger—chair, and we’ve had it for a long time. Although the armchair doesn’t match exactly, it goes okay with the sofa colors, and thus is a keeper for now.
And that about finished up our new living room seating for the time being, with the old green couch gone. It seemed like an eyesore next to our beautiful furniture! Next we’ll work on accents and accessories for our new living room.

Sunday, April 15, 2012

Recovered Rocker

Do-It-Yourself Decorating
Red Rocking Chair
How about a red upholstery fabric with gold-flowered diagonals for this rocker? The pattern seemed to strike a chord with the other chair, interestingly enough. The job of recovering it, however, proved a lot harder! First, we laid the back and seat pieces down on the new fabric. We traced around them, adding two inches for the padding thickness and a half-inch seam allowance, and cut out two of each piece.
Seat Detail
Sewing the covers together was not easy, since we had to put tucks in around the corners where the padding was curved. After stuffing the pillows into the slipcovers (very awkward!), I carefully slipstitched the openings shut. It surprised me by turning out beautifully, and I like how the gold flowers bring out the wood color again!

Saturday, April 14, 2012

Green Rocker

Do-It-Yourself Decorating
Ready to Be Recovered
This chair was a real find at the thrift shop. It’s a sturdy rocker, very comfortable, and in great shape (except for that perpetual squeak...need some oil). We realized that blue-green really didn’t match the sofa at all, though; I wanted to recover it with the pansy curtain fabric, but didn’t have enough left from the windows. What color of fabric would you suggest to match the sofa, curtains, and chair?

Friday, April 13, 2012

Corner Chair

Do-It-Yourself Decorating
Recovered Chair
Our next task was finding some furniture to complete the sofa set. We started with this chair, from the thrift store, which had a weird vinyl seat cover. I removed the vinyl and covered the cushion with this red star print. It was tricky with the curve in front, but it all stapled nicely underneath and then screwed back to the metal base. It’s handy since it doesn’t take up a lot of space like overstuffed chairs. I like how the stars bring out the yellow back.

Thursday, April 12, 2012

Curtains at Night

Do-It-Yourself Decorating
Candlelit Evening
I like this picture of the curtains at dusk, complete with some Christmas window candles. In front is one of my handmade dolls, named Paula, dressed in a traditional Japanese kimono. It’s funny, I made her about eight years ago, but the maroon and gold match the living room perfectly! She won that Second Place ribbon on her arm when I entered her in the fair last year (my handmade Swiss doll won First Place).

Wednesday, April 11, 2012

Living Room Curtains

Do-It-Yourself Decorating
Fancy Window Treatment
What do you think of these ornate curtains? I can’t even guess how long I spent on them, but it was definitely hours! We thought this fabric matched our new living room sofa pretty well—it’s a small maroon pansy print with gold highlights. We hung them on the main picture window in our living room, not yet sure what we’d do on the other two large windows (currently covered with worn, bleached-out lavender curtains leftover from a bedroom).
Curtain Ruffles and Ties
In this close-up, you can see the curtains’ ornate features. I put a two-inch, hand gathered ruffle along the inside edges of both panels, matching the tall valance ruffle on the top edge. The matching curtain ties were edged all around with a mini one-inch ruffle as well. All I can say is, we’d better use these for a long time!

Sunday, April 8, 2012

Happy Easter

Holidays
Easter Lilies
 "I am the resurrection and the life.
He who believes in Me, though he may die, he shall live. 
And whoever lives and believes in Me shall never die."
John 11:25-26

I love this beautiful bunch of lilies from my Birthday Bouquet. May all my dear readers have a wonderful Easter!

Nestboxes 2

Backyard Poultry
Six Egg Day
What better reward could we ask for in our brand-new nest boxes? Yeah, six eggs in a day was a lot back then! Here you can see I’m using a mixture of straw and wood shavings in the nest boxes, which the hens seemed to like better than plain litter. I am thankful to have a free source of wood shavings through my dad’s cabinet shop, as they can be pretty expensive to buy by the bale. I have to refill the nesting litter frequently, since the chickens love to eat the wood chips!
Full House
I’d say the nest boxes are pretty popular, wouldn’t you?
From left to right: Maple, Chestnut, and Pepper.

Wednesday, April 4, 2012

Bird's Eye View

Backyard Poultry
New Arrangement
Now we’re looking into the chicken house through that screen in the new door. In the back are the two roosts, underneath is the pophole door, and to the left are the new nest boxes. Very easy now to step in and gather the eggs, as well as rake the litter, change the water, clean the roosts.... well, just watch out for that overly-energetic rooster! For only being four feet by eight feet, I think it’s a pretty nice house.

Tuesday, April 3, 2012

Adding a Door

Backyard Poultry
The New Door
If you thought those nest boxes were something, take a look at this door! Here we are standing inside our shed, looking at the two lovely walls we built across the corner for our chicken house. Well, we had to grit our teeth and cut out a good-size hole (say, 24” by 72”) in that brand-new particle board wall. We used 2x4s to build a door frame around the opening, and a frame for the door. A piece of the cut-up wall filled in the lower panel in the door, and the top we left open. (By the way, my brother drew up the entire design for this door from scratch!) We covered the opening with 1/2” hardware cloth, and also made a styrofoam insulation piece to block it up for cold nights. It’s great for winter ventilation since it opens into the shed rather than right outside.

Monday, April 2, 2012

Triple Nest Boxes

Backyard Poultry
Brand New Nest Boxes
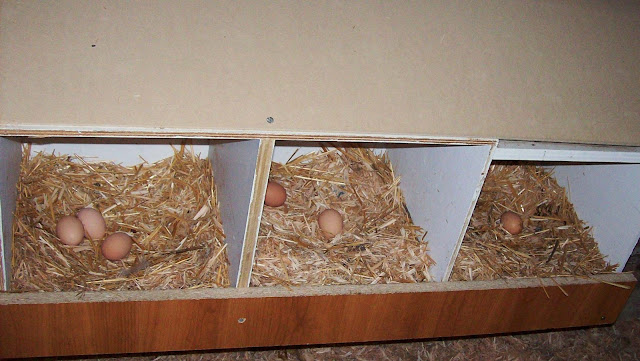
Here at last are the new nest boxes, made from painted ¾” plywood. We mounted them just inside the new door, about a foot off the floor. As far as measurements, they’re 14” square by 12” high, with a 4” lip on the front to keep in the nesting litter. We soon had to put a board slanting down over the top, to keep the hens from sitting up there. (I’ll let you guess why that’s a problem!) We used wood shavings in the boxes, but you can use straw too. Down to the right you can see our cute little hopper for grit (i.e. gravel) and oyster shells (calcium). These three nest boxes really worked well for our seven hens over the winter.

Sunday, April 1, 2012

Henhouse Makeover

Backyard Poultry
Construction in Progress
Okay, maybe makover is a stretch, but it was dawning on us that our chicken house had some major flaws. And that they had to be fixed before winter. The main issue was that the only way into the house was through the door on the end that we’re looking into in this photo. However, the chickens’ run had to be up against this same end whenever they were at home. Meaning we had to haul them out to grass every day in order to do the simple house chores. (A pain now, but impossible in two feet of winter snow!)
So… the remodeling began. Deciding to put a door in the opposite end of the henhouse, the roosts had to move to this side. Also, we had to relocate the nest boxes mounted in that far wall—we opted for inside boxes this time, which are there in the back. That brown board is covering the old opening, waiting for the door to be cut out.