Only the best from a bulletin board full of experience in such varied interests as poultry, art, good food, and Ohio history.
Come along on the adventure!

Be sure to also check out ohloveofgeocaching.com for travel and caching adventures!
Showing posts with label DIY Decorating. Show all posts

Monday, August 10, 2015

Ribbon Winners

Do-It-Yourself Decorating
Grand Prize
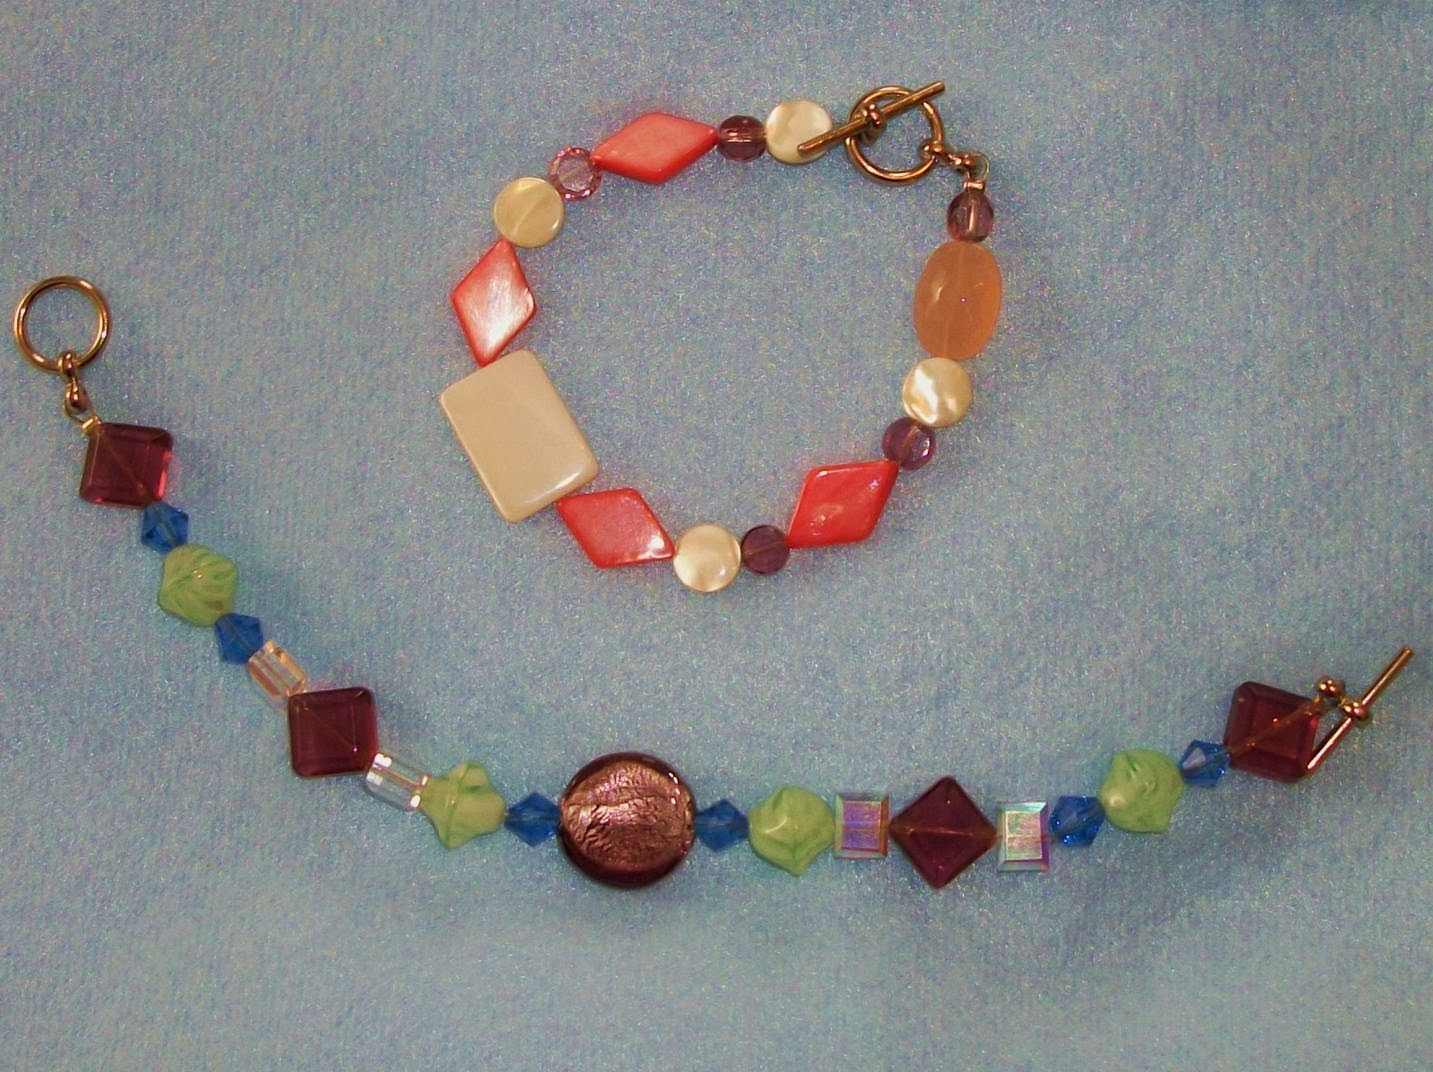
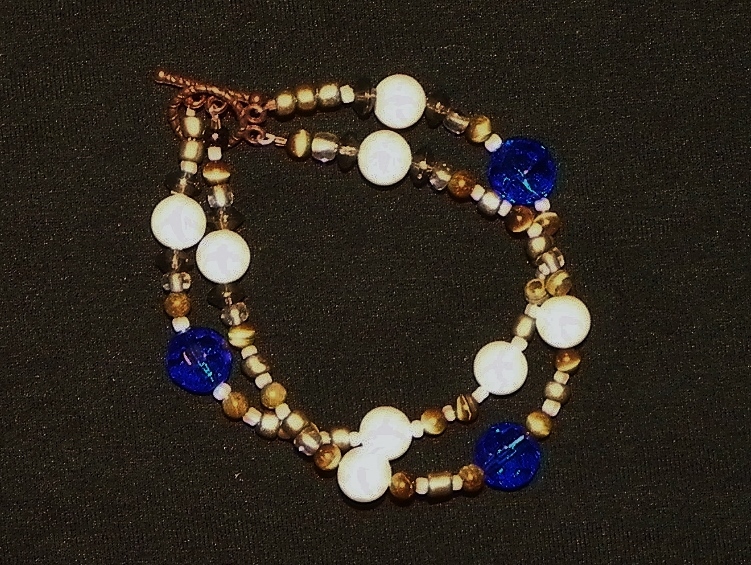
A closer look at my sister's entries at our county fair revealed not one but two ribbons! I agree with the judges that the blue one gets First Place. There was another jewelry entry that got Second, and her brown set finished with Third Place. Personally I think these were some of the nicest entries in the fair's fine arts gallery that year. Of course, after the fair was over and my sister had brought the entries home and photographed them, she had to dismantle them from their velvet mounts. This jewelry is just too pretty not to wear!

Saturday, August 8, 2015

At the Fair

Do-It-Yourself Decorating
Blue Jewelry Set
After dropping off the pieces of framed jewelry at the fair, we waited with anticipation for the fine arts exhibit to open. Would the pieces win anything? How much competition would there be? When the fair finally opened up, we rushed to the fine arts hall to see the exhibit. Biased as I may be, I thought my sister's pieces looked stunning amid the other entries on display. Can you pick them out in the pictures? Her hard work had paid off for this impressive exhibit. Oh, and do I see some prize ribbons on her pieces?!?

Brown Jewelry Set

Thursday, August 6, 2015

Framed Jewelry

Do-It-Yourself Decorating
Mounted and Framed
My sister decided to enter her beautiful jewelry pieces in our local county fair. To display them, she mounted them on black velvet in picture frames. This was a complicated process. I believe she used thread to attach each strand of beads in several places to the velvet, which had been mounted on cardboard. Thread attachments were needed at many places in order to keep the necklaces in a nice rounded position when turned vertically. My sister then removed the glass from two matching picture frames and inserted the velvet-covered cardboard. They really came out beautifully!

Monday, August 3, 2015

Brown Set

Do-It-Yourself Decorating 
Another Pair
And here, at last, is the completed brown necklace and bracelet set. It came out beautifully, just like my sister's first jewelry set. The rich blue beads stand out brilliantly among the brown and tan shades. This is an interesting style, spacing out large beads with much smaller seed beads. If you look closely, you will notice that even the seed beads range in size and shape. This necklace would match a lot of outfits, and the bracelet would just add the finishing touch.

Tuesday, July 21, 2015

Brown Jewelry

Do-It-Yourself Decorating 
Another Bracelet
After the success of her blue heart jewelry set, my sister proceeded to make another set. This one had a brown and dark blue theme, a more imposing presentation from the pastel hearts of the other jewelry set. It was also less complicated. The bracelet was simply two different strands hooked together at the fastener, rather than interweaving strands. Compare it yourself to the blue heart bracelet here. This is not to imply that it was any less difficult though. Stringing all those tiny seed beads is a tedious job which I do not envy in the least. The necklace below was made in a similar fashion to the blue heart necklace, with strings of graduated length so they would all lie evenly spaced together when worn. Check out the even tinier seed beads at the very back of the necklace. You wouldn't catch me stringing all of those little beads willingly!
. . . And Necklace
 

Friday, July 17, 2015

Blue Set

Do-It-Yourself Decorating
Complete Blue Heart Set
When completed, the blue bracelet and necklace made a beautiful set. My sister had done a lovely job! The blue hearts artfully placed in both the bracelet and necklace tied them together, while the blue oval shapes also repeated. The shared off-whites, pinks, and reds further harmonize the two pieces. In this picture you can also see better the many smaller seed beads that separate the large beads. Stringing these tiny filler beads was definitely a tedious job. But the effect is very striking.

Tuesday, July 14, 2015

Blue Jewelry

Do-It-Yourself Decorating
Blue Heart Bracelet
I have showcased plenty of my own beaded jewelry on my blog so far. However, I am now going to treat you with some examples of real handmade jewelry. My sister is a natural when it comes to beading, and has made some amazing pieces. Take a close look above at one of the first bracelets she made, and you will see how really complex it is. There are actually two strands of beads running around the entire bracelet, parting and joining wherever you see them cross over each other. This was not an easy piece of work, to say the least, and I know since I watched the whole process.
My sister made the necklace below to complete a set with the bracelet. You might notice similar beads in both. The delicate task of this particular beadwork was not interweaving bead strands however; it was creating separate ones. Each of the three strands of beads in the necklace had to be made respectively shorter in order to lie flat at the same time without unsightly overlap. This was not easy either, but you can see that they are all arranged equally with near perfect spacing. Joining all three strands at the top clasp was another operation unto itself, and even I cannot tell you how she managed to knot all the strands together in one fastener. I must say both came out beautifully, regardless of any personal bias!

Blue Heart Necklace

Friday, February 6, 2015

Jewelry Set

Do-It-Yourself Decorating
Bracelet Revisited
Finally, the jewelry set was ready to put in the mail for my pen friend's Christmas gift. I couldn't resist one more picture of the bracelet before seeing how the set fit together. I thought it looked just beautiful! I was sorry to have to part with the set. The funny thing is, I did not even know at the time that teal was my pen friend's favorite color. She sent me a knitted scarf the same Christmas, and it was just the same teal color as the jewelry. I was so tickled that I chosen her favorite color without knowing it!
Teal Set
 

Wednesday, February 4, 2015

Teal Necklace

Do-It-Yourself Decorating
Necklace Close-Up
Of course, a bracelet is not complete without a matching necklace. I used the same teal beads and silver fillers to make a medium-length necklace. In addition to the little clear diamond beads, I also added some multi-faceted rectangular  clear beads. I love the little silver "LOVE" bead I added on - it adds both personality and interest to an otherwise symmetrical necklace. I'm sorry, I know the background is a little weird; it turned out to be unexpectedly hard to photograph these sparkling beads.

Necklace
In this full-length shot, you can see how I graduated the bead size from front to back. I found smaller blue-green beads that almost matched the large teal ones, and mixed them with smaller clear beads. Stringing those tiny translucent beads was not easy, to say the least. It took a lot of patience and a steady hand!


Monday, February 2, 2015

Teal Bracelet

Do-It-Yourself Decorating
Bracelet Gift
This lovely little bracelet was a labor of love for my pen friend in Maryland. As soon as I found these sparkling teal beads at the store, I knew I would be taking them home. Ornate silver bead separators and clear crystal-like diamond beads made an elegant combination. I combined silver stand-alone separators and tapered ones to frame the teal centerpiece beads. I also used a silver clasp on the ends, although it is difficult to see. The length of the bracelet was a little tricky since I had never met my pen friend. Usually I take measurements and figure it as I explain in this post. However, I made a guess as to a standard length and added a little extra to make sure.

Sunday, April 20, 2014

Happy Easter!

Do-It-Yourself Decorating 
Easter Garden
May this Easter be a blessed time for all my dear readers! This little garden is a perfect reminder of the significance of Easter. And it was easy to make at home! It started with spray painting a little clay pot gray. Then we turned it on its side in a flat plastic pan and heaped potting soil all around. The crosses were made from little sticks broken and glued together, stuck into a piece of florist's foam behind the pot. Teasing out green moss to cover the dirt was a challenge. A small piece of white fabric for the grave clothes and a round stone rolled away from the tomb finished it off. It reminds us of the wonderful proclamation that first Easter Sunday:
 
“Do not be afraid, for I know that you seek Jesus Who was crucified. 
He is not here;
for He is risen, as He said.
Come, see the place where the Lord lay."
Matthew 28:5-6

Friday, February 14, 2014

Silver Heart Bracelet

Do-It-Yourself Decorating
Red, Red-Orange, Orange
Last but not least, here is a very unique statement. In fact, it combines beads from at least two other bracelets I've featured (did you spot the blue hearts and the red teardrops?). Those maroon ones almost look like jelly beans! They have an interesting competition with the smaller 'focal point' orange bead. The red teardrops? . . . No comment. Somehow the bracelet does hold its conflicting parts together though. The silver heart shape is repeated by the blue hearts, which in turn are repeated by the blue round beads, which lead your eye back to the focal point. As you can tell, I did not personally string this bracelet, but it is evident there are no boundaries to what you can try with beaded jewelry!

Wednesday, February 12, 2014

Green Bracelets

Do-It-Yourself Decorating
Pink and Green
Speaking of color schemes, here are two different bracelets made from the same colors. My sister likes this shade of spring green and had a lot of green beads on hand. She chose red and light pink to compliment the green and took off from there.
The left-hand bracelet began with green hearts separated by small pink beads. The three red-flowered beads are really unusual - each one is like a red cylinder bead overlaid with flat pink flowers and covered in a clear round ball. They picked up the pink as well as the flat red beads she used. The silver heart-shaped clasp my sister found adds a personal touch.
The right-hand bracelet, on the other hand, takes a whole different tack. It uses a cylindrical green bead covered in flowers for the focal point. Light pink and coral beads intersperse with the spring green spheres. The red teardrops bring almost an iridescent glow in contrast to the little brown beads at their bases. Contrast is the word for this bracelet - red and green, diamonds and circles, flat and round. I'd call it heavier and sharper compared to other flowery bracelet. Which one do you like better?

Monday, February 10, 2014

Purple & Pink

Do-It-Yourself Decorating
Formal Bracelets
I like to wear these two dainty bracelets with dress clothes. For the top bracelet, I chose coral pink diamonds and round white beads. The purple circle beads created an interesting color combination. I used a matching white rectangular bead as the focal point. You have a choice when making a bracelet: you can either create an even pattern of beads, or you can build up the beads symmetrically to a central focal point bead. I decided on a focal point for both of these bracelets. 
A large, glitzy plum-colored bead created the focus for the purple bracelet. It's always good to have a color scheme in mind so you don't end up with a dozen different colors. I thought purple and green would be good for this bracelet. I found purple diamonds to match the central bead, separated by little blue diamonds. The mint beads are very unique, with their swirled, convex pattern. Finally, the rectangular, chisel-edged clear beads add an ornate touch.

Saturday, February 8, 2014

Blue Flower Bracelet

Do-It-Yourself Decorating
Blue and Orange
This bracelet has a much different feel than the last one. Large blue beads covered with opaque blue flowers are the focal points. Matching blue oval beads repeat the color, while rusty red seed beads create an interesting contrast. If you look closely, there are also some rust-colored spacers in between the other beads. I'm pretty sure my sister put this bracelet together, and you can see her tastes are a bit different from mine!

Friday, February 7, 2014

Heart Bracelet

Do-It-Yourself Decorating
Bracelet #1
Now let's get back to making jewelry! I think I've covered all the steps for making your own beaded jewelry, so now I'll show you a few hand-made bracelets. The one above is my favorite from all the bracelets I've made. I started with the translucent blue heart beads, and added matching blue ovals. I thought it needed some brighter color accents and the coral pink seemed just the right fit. The interesting shapes of the opaque white beads made a nice filler. I used the clear diamonds to accent the center pink bead. I almost wish now I had used the diamond beads for all the filler beads - it would have been a lighter and more delicate look.

Thursday, November 28, 2013

Happy Thanksgiving!

Do-It-Yourself Decorating
Autumn Arrangement
 Here's to a wonderful Thanksgiving to all my dear readers! The fall colors in this bright bouquet seemed just right for this year's celebration. I recently made this arrangement from a bunch of odd flowers my mom picked up from our grocery store. It brightened the room of my grandpa who is in the nursing home recovering from hip surgery. This cheerful bouquet reminds me of a passage from Psalm 95:1-2 to bless this Thanksgiving season:
 
Oh come, let us sing to the Lord!
Let us shout joyfully to the Rock of our salvation.
Let us come before His presence with thanksgiving;
Let us shout joyfully to Him with psalms.
 

Sunday, October 20, 2013

Finished Bracelet

Do-It-Yourself Decorating
Bracelet
 To finish up the bracelet, simply repeat the steps in my last post on the opposite end of the wire. The only difficulty with this one is that the crimp bead has to be right up against the first bead on the bracelet. It's not quite so easy to feed the beads onto the loose wire after you squeeze the crimp bead. Instead, you have to feed the wire through about three or four beads on the bracelet. Then cut it off as close as you can and do your best to stuff it under the next bead. It not always easy, but it usually works itself in eventually. And there you have it - a beautiful handmade bracelet! The one above I made for my mother. I was really pleased with it, and I think she was too!

Saturday, October 19, 2013

Crimping Pliers

Do-It-Yourself Decorating
Beading Pliers
The final step is squeezing that crimp bead tight in order to hold the two pieces of wire in place, capturing the fastener in the loop. To accomplish this you use a special pair of beading pliers. You can find them in the beading section of a craft store as well. They have blunt ends that work perfectly for the job. Use your fingers to push the crimp bead tight up against the fastener loop (see the picture below). Then gently squeeze the crimp bead flat. Be careful - you can break the bead in two with too much pressure (I know from experience). Just tug on the loose ends of wire after you're done and that will tell you if it's tight enough.
Crimping Bead with Pliers

Thursday, October 17, 2013

Crimp Bead

Do-It-Yourself Decorating
Crimp Bead and Fastener on Bracelet Wire
Once you pick your choice of fasteners, you're ready to attach them to the bracelet. You can put one of the two on before stringing the bracelet, or do both afterward. It's up to you. The process is a bit tricky though. It involves one more component: a TINY oblong bead called a crimp bead. You can buy these little beads in packages but they often come with the fasteners as well.
To set it up, thread the crimp bead onto the wire on one end of your bracelet. Then thread the wire through the little loop on the fastener. Now here's the tricky part: thread the end of the wire back through the crimp bead again. You should get something like I have in the photo above. Hang on; we're almost there!