Only the best from a bulletin board full of experience in such varied interests as poultry, art, good food, and Ohio history.
Come along on the adventure!

Be sure to also check out ohloveofgeocaching.com for travel and caching adventures!

Tuesday, October 30, 2012

Daisy Bouquet

Do-It-Yourself Decorating
Beginning the Arrangement
I didn’t have flowers in mind when I bought this cute little ceramic bowl. But we had bouquet around in the ugliest green-painted tin cup you could imagine; so, I decided to try and give the flowers a face lift. To start with, I cut and fitted a piece of floral foam into the crock’s mouth. Then I cut—or rather gnawed—apart the original bunch of flowers (they turned out to be mostly wire) and surveyed the assortment. It seemed the daisies should be the focal flowers, so I spaced them out evenly around the sides and top of the foam. And the leaves came right along!

Sunday, October 28, 2012

Amazing Brownies

Gluten-Free Gourmet
Dig in!
Did you think brownies were something you’d have to give up if you went gluten-free? Well, not any more, with this amazing, no-wheat recipe that my sister perfected! Even with a small amount of chocolate (reducing the carbs and other unwanted things), it still came out very rich. And then there’s the secret to that pink icing, we’ll get to in a minute!
Combine and microwave on high til melted, stirring to combine:
1-2 ounces bittersweet chocolate (depending on your taste), chopped in small pieces    
1/4 c. butter                          1 T. cocoa powder
Next, whisk together in a bowl:
1/2 c. honey                  1/4 t. salt                   1/2 t. vanilla extract
melted chocolate mixture   
Add 2 eggs, mixing after each. Last stir in 1/2 c. sifted oat/rice flour and 1/4 t. baking powder.
Spread the batter in a 7x9-inch glass pan (or something around that size), lined with foil and greased well. Bake for 25-30 minutes, til just set in center.
For the frosting, combine:
1/2 c. cream cheese                 1/4 c. honey                  1/2 t. vanilla
1/4 c. blackberry jam
(Can you guess which ingredient lends that gorgeous purple color?)
Beat with a mixer til very smooth. Gently spread over brownies while still warm.
Pretty Purple Frosting
Of course, you can use cocoa powder instead of the jelly for a more traditional icing. Both are delicious, of course.
This recipe makes a very small pan on purpose. Since it’s still a bit heavy with carbs (the chocolate and all), we like to give out pretty small servings at once. They’re so good, a little bit goes a long way! Enjoy!

Wednesday, October 17, 2012

More Flowers

Artist's Gallery
Colored Pencil Lilies
Here are a few more flower drawings to compare. I always find it interesting to see the differences and similarities between colored pencil and acrylic. Both these pictures were drawn on cards. I sent them both to two different of my pen friends who lived in Germany as birthday cards. I even made a little clay tea set to send with the card above, which cost me more to mail than to make... But my friend loved it! Please don’t even ask if I drew these from imagination—never. I went through a flower bulb catalog and picked out blossoms from there to draw: tulips, lilies, and bluebells. Flower seed and bulb catalogs are always a great source to draw from if they have a lot of nice pictures! I especially love the new multi-colored tulips they’ve come out with.
Birthday Bouquet

Tuesday, October 16, 2012

Sunflower Trio

Artist's Gallery
Sunflowers Three Ways
On the note of summer flowers, here is an interesting study (not quite like Van Gogh’s sunflowers!). I did all these pictures from the same photo I took of a sunflower in our yard. However, I used different media for each. The top one on the left side is colored pencil, below that is acrylic, and the right hand painting is watercolor. They’re all done on plain paper, but the acrylic one is a card. In fact, you can see it up close right here in an earlier post. It’s very interesting how similar the colors came out in each version, but the effect is different depending on the medium. I think the acrylic is brightest, while the colored pencil is very blended, and the watercolor seems most realistic. Which painting do you like the best?

Sunday, October 14, 2012

"Long Summer Days"

Artist's Gallery
My Painting on the Calendar

Yes, my painting is on the calendar! Just a note here, thanks to my family for generously helping out with most of the votes for it (“loading the ballot box” as one of my artist friends put it!). Still, I thought it was a beautiful representation of our rural county, right down to the title, “Long Summer Days on the Farm.” And July is the perfect month to display it on! I like it with that black border...maybe I should try a black frame?… Of course we bought several calendars, and I will always treasure this picture, even when the calendar's months are over.

Friday, October 12, 2012

Calendar Contest

Artist's Gallery
Gallery Calendar Featured Pictures
Last year, I had the opportunity to share my painting “Summer Evening.” Our local art gallery was planning a 2012 calendar to sell. They decided to have a competition among local artists for the pictures that would appear on it. A couple dozen pictures were entered that were somehow related to our county—scenes from parks, farms, fields, downtown streets and houses, and even a photograph of the courthouse. Through the month, gallery visitors voted through their donations for the pictures they liked best, and at the end of the month, the twelve winners were chosen. I couldn’t wait til the deadline to see if they had picked my painting! Here is a sneak peak at all the paintings which won...do you see mine there?

Monday, October 8, 2012

Summer Set

Artist's Gallery
"Summer Afternoon" & "Summer Evening"
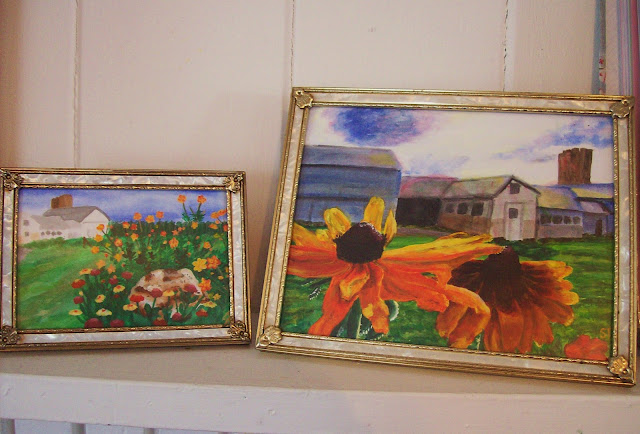
Now we can compare both paintings side by side. I found matching white-marbled frames with gold trim that fit them, and I liked the lighter color rather than the gold I showed earlier. They made a perfect set, sharing the same barn motifs and bright summer colors, with just enough variation too. I like how the flowers are so big in the larger painting, and very small in the little painting. Really, you have to do at least a two-painting set when they’re this small size, so they don’t get lost on the wall when they’re hung up. At least that’s what I found when I tried to decorate my room with a dozen of my 8x10 paintings!

Sunday, October 7, 2012

Cosmos Photo

Artist's Gallery
Reference Photo
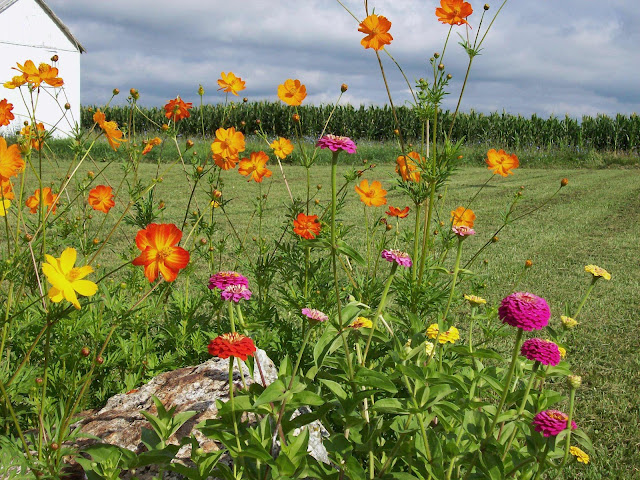
Here is the photograph I painted "Summer Afternoon" from, only a bit different view...I think it got cropped or something. But don't you see the same look in the sky, like just before a summer thunderstorm? And yes, there's a good old corn field below. We grew the zinnia and cosmos flowers here the year before I planted the black-eyed Susans in the other painting, "Summer Evening."

Saturday, October 6, 2012

Summer Afternoon

Artist's Gallery
Framed Painting

Here is the sister painting to “Summer Evening.” Same barn, same background, but a smaller scale—this painting is only 5” by 7” instead of 8x10. I still remember, this was the painting I worked on the first day I went to my art group. Everyone else was painting much larger canvases, and I felt very outnumbered!
Like “Summer Evening,” I painted the background first, watercolor-acrylic style. I think the dark, thunder-stormy look of the sky and the brown splotches in the grass give it that late-summer look. When dry, I applied thick, bright paint for the flowers and rock, covering over the background colors. I think it’s a cute little picture!

Thursday, October 4, 2012

Summer Photo

Artist's Gallery

Original Photograph
And now, you can see the original picture I used to copy. Time for the critique: how does it compare to my painting? . . . Or rather, how does my painting compare to it? I believe I took the photograph myself, in front of the old barns right on our property. And the black-eyed Susans were grown from seeds sent by my penpal from Georgia! For that reason, and because it just seems like the essence of a farmer's life, I will always treasure this painting. Oh, and also because it won the Art Guild's calendar contest--more about that in a minute!

Wednesday, October 3, 2012

Summer Evening 2

Artist's Gallery
Gold Frame
So how do you like my frame? I actually found the frame before I painted the picture, so I could cut the cardstock to the right size before starting. This was back before I was taking any art instruction, and later one art teacher told me I should have added white to the yellow on the flowers to make them brighter. The yellow paint, even if applied straight from the tube, just could not be as brilliant as I wanted—and I never thought of adding white! See this technique demonstrated on my other flower painting, Fireworks, right here.

Monday, October 1, 2012

Summer Evening 1

Artist's Gallery
Barns & Black-Eyed Susans
Well, it’s not winter yet, and here is a painting to celebrate these last days of summer we’ve been enjoying. I did this one two years ago in July, in the dead heat of summer! I still love the whole composition, old barns with country flowers catching rays of sun from an early-evening sky, though now I see ways I could improve how I painted it.
Regretfully, I don’t have step-by-step pictures, but here’s a brief overview of how I painted it. The barns were done in watered-down acrylic paint, hence the watercolor effect, which doesn’t distract from the foreground. I really layered the paint onto the flowers, shades of golden yellow, lemon yellow, yellow-orange, and maroon, to try and shape the petals. I mixed extra yellow into the grass greens to reflect the sun, also echoing it in yellow washes on the barn roofs. I wasn’t really happy with how the sky came out, the clouds are such a dark blue they look like storm clouds almost. The problem was using ultramarine blue, which just doesn’t mix with white that well, but I had no other blue at the time. But I still love the painting. Coming soon…“Summer Evening” finished and framed!