Only the best from a bulletin board full of experience in such varied interests as poultry, art, good food, and Ohio history.
Come along on the adventure!

Be sure to also check out ohloveofgeocaching.com for travel and caching adventures!

Saturday, December 31, 2011

Cooking Squash

Gluten-Free Gourmet
Squash Cooking
Now we’ll see how to cook the squash for the cheesecake. We usually use either: one small butternut squash, two sweet potatoes, one acorn squash plus one sweet potato, or one small pumpkin.
I like to use a large knife and mallet to cut the squash in half; then I scrape out the pulp and seeds (the chickens love them). Next, place the squash and/or sweet potatoes in a pan, skin side down, in about an inch of water. Heat to boiling and simmer for 20-30 minutes.

Scraping Squash
When the squash pieces are soft, dip them out of the pan. After they cool, use a spoon to scrape the flesh out of the skin. It should be about 3 cups, ready to use in your next cheesecake. We like to do ours the day before so it’s always ready in the fridge. This fall we’ve been enjoying our own garden squash in the cheesecake—what a flavor!

Friday, December 30, 2011

Squash Cheesecake

Gluten-Free Gourmet
Beating Cheesecake
This recipe has a special twist on regular cheesecake which gives it extra creaminess and flavor: cooked squash. I cook butternut or acorn squash, sweet potatoes, or pumpkin and mash it up. The cheesecake is quite fast to whip up, and we eat it all the time as a high-protein, low-carb, and delicious snack. Also add it to top off any meal.
First, combine in a bowl and beat well:
1 8-oz bar cream cheese            1/4 c. honey          1 t. vanilla
      1/4 c. oat/rice flour        1 t. cinnamon       1/2 t. cloves                            
Then beat in:           3 free-range brown eggs
Finally, add and beat well:
3 c. mashed squash, or 1 16 oz. can pumpkin 1/2 c. water

Golden Treat
Pour into a greased 9x9 casserole dish and bake at 350° for 45-50 minutes, til it’s nice and brown on top. Cool, cut, and dip out small slices.

Wednesday, December 28, 2011

Happy Birthday

Artist's Gallery
Birthday Card
Today is my Little Sister's birthday, and so I'm posting the card I painted for her. We used to live by a barn full of cats, and this beauty was my sister's favorite. I hope it makes her party a very special celebration. Happy Birthday Little Sister!!

Tuesday, December 27, 2011

Christmas Dinner

Gluten-Free Gourmet
Winter Feast
Our family enjoyed a wonderful dinner on Christmas Day. Although we did deviate from our menu’s guidelines a little, the unusual dishes were well worth it. The vegetable pie (far left in photo) and meatballs were all low-carb foods but still delicous—I’ll post the recipes sometime. We bought a packaged cornbread mix, which contained wheat and cornmeal, and even added bacon, but served little enough that (we hope) it wasn’t a problem one time. Same for the cherry pudding, which took condensed milk. The pink jello was really extravagant: cranberries, apple, orange, cream cheese, and flavored cherry and orange gelatin. What a pack of flavor! When you usually eat healthy, you can manage a few extras once in a while. Happy holidays to all!!

Sunday, December 25, 2011

Merry Christmas

Artists' Gallery
Candle Light
This post is to say to all my dear readers, Merry Christmas and Happy New Year! This is my theme Christmas card from last year; I painted five or six original copies assembly-line style to send out. I composed the scene myself, with no reference photos at all, which is kind of unusual for me. And here is the beautiful verse which I wrote inside the cards.
"For it is the God Who commanded
light to shine out of darkness,
Who has shone in our hearts to give
the light of the knowledge of the glory
of God in the face of Jesus Christ."
2 Corinthians 4:6

Saturday, December 24, 2011

Fireplace Shelves

Do-It-Yourself Decorating
Shelf Display
Now for the wall shelves next to the fireplace: I first removed the piles of books and clutter. Then I created a nature display with glass jars and leaves, bark, pinecones, and rocks we’d collected. Several more of my paintings created a complimentary background. This area will probably be getting even more work once we get our color scheme going. For now, this is a big improvement!

Friday, December 23, 2011

Fireplace

Do-It-Yourself Decorating
Fireplace Display
We decided to divide the large room between the study area and living room. To start with, we realized that the fireplace couldn’t really be used as a focal point because of its position in the room. We thus decorated it as simply a pretty backdrop. After covering up the fireplace opening (it was an ugly shade of green), we hung the guitars for display across the fireplace. I cleaned up the mantle and decorated it with paintings, seashells, and plants. Interesting combination!

Thursday, December 22, 2011

Room Survey

Do-It-Yourself Decorating
Beginning Seating Area--Desks + Clutter to Left
The layout in our house made it hard to find a place for the living room. Besides the kitchen, there were two other rooms. The first was so small you couldn’t really fit a comfortable a seating area. The second was much larger, but broken up by the front door, a staircase, three windows, and an out-of-use fireplace with wall shelves. At the time, the room held cluttered desks, schoolbooks, computer equipment, and musical instruments, plus the couches. The living room set felt like it was pushed off in the corner, with no definition or color scheme. So my job was to incorporate all our work areas, plus a seating area, into these two rooms.

Wednesday, December 21, 2011

Starting From Scratch

Do-It-Yourself Decorating
A "Perfect" Living Room
Decorating is more than putting up pictures, hanging curtains, or even arranging furniture. Decorating really means creating a comfortable yet attractive room that serves a variety of purposes. A daunting task, to say the least! And I believe that the living room is most difficult room of all. For our family, the oddly-sized rooms of our old farmhouse and somewhat unusual furniture mounted an even greater challenge. So, what do you do if you don’t have the perfect room or furnishings? First, come along with us on our living room journey!
Beginning Furniture: Sofa
Couch
To begin, let me tell you about our furniture. We started with an antique couch we purchased second-hand years ago (it was red at that time but we since recovered it) and a very large futon sofa which folds into a bed. We liked neither piece of furniture, but couldn’t find a good replacement for the couch. As for the sofa, we removed the whole wooden back frame, and cut off half of the cushion, resulting in a low, deep bench and cover-less cushion. Also, add to that a swivel arm chair and several end tables. This was the situation when I took on the job of redecorating our living room.

Sunday, December 18, 2011

Goodbye, Birchie

Backyard Poultry
Birchie in the Yard
This is one of our Araucanas named Birchie. On Friday while we were away, a little hawk flew into the tree in our yard over the chicken pen. The hens all crowded into the wire-enclosed runs as usual when they see a hawk, so it couldn’t swoop down and grab them. But this bird flew down to the ground outside the run and reached through the wire to catch its prey. Sadly, it was Birchie. This was our very first loss to a predator in the past two years of keeping them, and we really don’t know why it happened just now. The other 23 hens were quite traumatized and spent the next few days huddled in their house.
Laying a Blue Egg
Here is Birchie in the nest box (before it stopped laying for the winter). It had beautiful feathers and was always a little smaller than the other hens. When I let the hens free-range, I liked to pick it up and give it a boost into the air so it could flutter down like a bird. Birchie would tag along after the other two Araucanas, peeking out from behind its feather tufts. Recently, though, it was staying alone in the house much of the time, like the other hens were harassing it. Birchie was a joy to raise for the nine months we had it. I think I’d rather have enjoyed it and then lost it, than never have raised it at all.

Saturday, December 17, 2011

Fireworks Card

Artists' Gallery
Flower Card
Did you recognize this as another painting from that same photograph? This is actually a greeting card I did about a year before the large painting. As the instructor at my art class pointed out, it’s quite a bit darker than the photo. The background, especially, is too dark, but I like the depth it creates. I kept putting on more and more of the pure paint color to try to lighten it up; I later realized you add white to the paint to get the lighter shades. And lighter shades make all the difference in a painting!

Friday, December 16, 2011

Fireworks Photograph

Artist's Gallery
Reference Photograph
And now, here is the photograph that I used for the “Fireworks” painting (view it here). You can see how the painting followed the basic structure of the photo, and the front flowers have the same tilt and overlap. The colors are a little different, since I did the painting to match our living room. The flowers are also arranged much more geometrically in the painting, which has some good effects but does look a bit unnatural. Are there any other differences you see?

Thursday, December 15, 2011

Frying Eggs

Backyard Poultry
Sunny-Side Up
Yum!! Nothing is better than a free-range, rich yellow egg sunny-side-up! The fresher the egg, the more the white stands up, and these are no exception. We had always got our eggs from a local farmer who has natural feed and large barns for his hens, and we thought those were much better than grocery store eggs. We didn’t know they could get better—these eggs are truly liquid gold! Here is a riddle I read once about an egg.
In marble halls as white as milk,
Lined with a skin as soft as silk,
Within a fountain crystal-clear,
A golden apple doth appear;
No doors there are to this stronghold,
Yet thieves break in and steal the gold.

Wednesday, December 14, 2011

Gift of Eggs

Backyard Poultry
Egg Carton
Although we could eat all the eggs we got, we also gave them away as gifts. The ones above were for our landlord, who operated this farm for many years. The livestock has been long gone except for a few barn cats—until our chickens arrived. In the old barn you can still see the milking stalls, the cattle walk for loading cows on the truck, the musty hay loft, and some old machinery. The family who milked the cows always lived in the house here. So I think our landlord is happy to see farm animals on the place once again!

Tuesday, December 13, 2011

Nestbox

Backyard Poultry
Hen in Lower Nest Box
Here’s one of the young hens trying out the nest box. At first they’d lay their eggs almost anywhere, but soon they became very particular about laying, preferring nests that already had eggs in them. You could tell which hens were lower on the pecking order, since they’d have to leave the more-desirable nests if higher-up hens wanted to lay! We had this double-decker nest box to use when the chickens were out in the runs, and two boxes in the henhouse. The ones in the house were opened from the outside—but, for the hen’s sake, no spying when occupied!!

Monday, December 12, 2011

Basketful of Eggs

Backyard Poultry
Eight-Egg Day
Aren’t these eggs a beauty? There’s nothing better than going out and collecting freshly-laid eggs from your own nest boxes. It took my eight hens about six weeks to get up to seven and eight eggs a day. I even took pictures of every single egg I brought in for a while, I enjoyed them so much! Our next discovery was that Acorn, our “Easter egg” Araucana, did not lay blue eggs! (You can see the eight eggs here, and none is blue!) Later, I found out some Araucanas lay “pink” instead of blue eggs. I guess Acorn cheated on us—have to try again next year!

Sunday, December 11, 2011

First Egg

Backyard Poultry
An Egg in the Grass
It was early August and the chickens were out in their runs on the grass as usual. I was just out checking their water and food, and suddenly—surprise!—I saw a little brown egg lying in the grass! What an exciting moment!! Since it was a week and a half early, and no nest boxes yet existed, we quickly constructed a makeshift box and put it in the run. The chickens all took great interest in it and took turns climbing in and out (even the rooster!). I’m not sure if they understood the nestbox’s real purpose or not!

Friday, December 9, 2011

Wildflowers

Artist's Gallery
Wildflowers on Roberts Pass
This painting is very similar to “Fireworks,” only it’s a watercolor that I painted two years earlier. I combined several photographs we took on a biking trail called Roberts Pass near our house. The greenery was next to impossible, and the goldenrod and honeysuckle proved very hard in watercolor! I donated the painting to a fundraising auction for our local Madison County Parks and Trails, who maintain the bike path.
Glass Frame
Here is a little poem I wrote about the painting a while later:


To make a painting of the trail,
I chose a subject—flowers.
I carefully drew each one to scale,
And painted them in layers.
Soon purple, lavender, and white
Stood out against the green.
I’d caught a sparkling memory of
A radiant summer scene.

Thursday, December 8, 2011

Fireworks 6

Artist's Gallery
Framed Painting
And now . . . my finished painting in its hand-made wooden frame. Final touches included fluorescent highlights on the petals and a few more details for the bachelor’s buttons and flower centers. I was pretty pleased with it, and entered it in our local Madison County Fair with several of my other paintings. They all won First Place! (To be entirely truthful, each one was the only entry in its category—but the judges still seemed to like them a lot.) “Fireworks” now hangs proudly in our living room over our newly-covered sofa.
New! You can now purchase this painting as a greeting card here at my Countrygirl Art shop on Etsy.com!

Wednesday, December 7, 2011

Fireworks 5

Artist's Gallery
Filling out Foliage
Can you spot the difference? It’s the leaves this time. I already had a good dark background in there, so all I had to do was add a lot of thick, light paint to bring the leaves out to meet the flowers. Besides each leaf having a light and dark side, the foliage gets light towards the background. It was quite a job! I also realized (toward the end) that I needed to create an overall pattern in the tangle of green to lead the eye around the picture. How do you think I did with the paths in the foliage?

Tuesday, December 6, 2011

Fireworks 4

Artist's Gallery
Flowers
Those highlights really pop now! I used lemon yellow on the black-eyed Susans, dusty rose and gold on the coneflower, and light red for the zinnias, blending it into the darker shades on the petal edges. The background flowers, though not as sharp, are also taking shape. Those blue blobs will hopefully turn into bachelor’s buttons. I’ve also worked a lot on the flower centers. The next step will be giving the foliage more depth to match the flowers.

Monday, December 5, 2011

Fireworks 3

Artist's Gallery
Priming for Highlights
Are you wondering what all this white paint is doing here? If I were to just paint the highlights over the petals, the dark colors would show through and tint the paint. So artists often do an undercoat of white to make sure their light colors are bright enough (lighter paints, especially yellow, tend to be more transparent than darks). It can take two or even three coats of white paint to really cover up the dark paint. This painting is still in the “mess stage” (professional art term thereJ…), before all the elements have quite come together.

Sunday, December 4, 2011

Fireworks 2

Artists' Gallery
Background Darks
Here is the beginning of the shaded areas of the picture. Dark colors are vital to all paintings. They give depth, create feeling, and punctuate the future highlights. I have had paintings that just didn’t “pop,” and that’s usually what the problem was. You should also use the darks to create general patterns and paths through the painting, especially in foliage like this, which I haven’t done very well so far. Remember, this is only my second large canvas to paint!

Saturday, December 3, 2011

Fireworks 1

Artist's Gallery
Undershading
Here is one of my more recent paintings, from last July (Fourth of July, that is—hence the name). If it looks washed out, that is correct, since this is only the underpainting. I’m trying to establish where the shapes, lights, and darks are, while keeping the colors close to what I want them. This painting is a collage of wildflowers from our flower beds, and I’m trying to match the colors to our new sofa cover fabric. It’s going to be interesting!

Thursday, December 1, 2011

Jelly Souffle

Gluten-Free Gourmet
Beating Egg Whites
Is your mouth watering yet? I'll tempt you with one more dessert recipe. This is a very simple souffle which has almost a cake texture when finished. Better yet, it uses no flour, only eggs, and so it can be enjoyed as often as you like. We'll start by beating 3 eggs whites til they form stiff peaks.Next, beat well in a large bowl:
3 egg yolks                         1 T. water                  1 T. honey
Pour in the egg whites and fold together til just mixed. Bake in a shallow, well-greased small pan at 400° for 8-10 minutes, til brown on top. Remove from the oven.
Sliced Soufflé
After the pastry cools (and sinks considerably), gently flip it out of the pan, upside down onto a plate. Spread the bottom generously with real, fruit-sweetened jelly—my favorite is strawberry. Fold the soufflé in half lengthwise and cut in quarters. This recipe makes four small servings, but could be easily doubled if you'd like more.

Tuesday, November 29, 2011

Apple Pie

Gluten-Free Gourmet
Chopping Apples
And now, for the classic apple pie. Apples are a little high in sugar, but we find if we only have small servings occasionally, we can still enjoy apple pie. I like to use Gala apples in this recipe, as they’re softer and sweeter than Red or Golden Delicious. Combine in a saucepan and simmer til softened:
1 Gala apple, chopped in ½” slices                                     ¼ c. honey
1 t. cinnamon                                                                      ½ c. water
Beat separately and mix into apples:
2 eggs                                                                        1 t. vanilla extract
Pour into pre-baked pie shell (made from Basic Pie Crust recipe) and bake at 400° for 20 minutes. Cool and slice.
Apple Pie
You could also make a crumb topping by sprinkling a mixture of, say, ½ c. rolled oats, 2 T. honey, and ½ t. cinnamon over the pie before baking. Simply delicious!

Monday, November 28, 2011

Pumpkin Pie

Gluten-Free Gourmet
Holiday Treat
We couldn’t forget those wonderful Thanksgiving pies at this time of year! Here is an outstanding pumpkin pie using the same easy crust. To fill a regular-size pie shell, I suggest doing triple the recipe. For a mini-pie, combine in a bowl and beat well:
3/4 c. cooked, mashed fresh pumpkin, or 1/2 c. canned pumpkin
2 oz. soft cream cheese                   1/4 c. honey
1 t. cinnamon                                                    1 egg
2 t. vanilla                                                   Pinch salt
1/2 t. each ground cloves and nutmeg
Pour into crust and bake at 350° for 20 minutes, til browned and almost set. Cool and enjoy!

Sunday, November 27, 2011

Blueberry Pie

Gluten-Free Gourmet
Simmering Berries
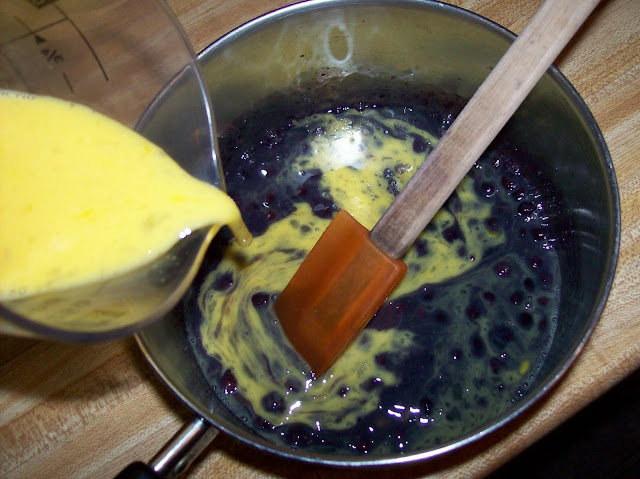
Yum...now let’s make some fillings for that pie crust. Blueberries are a great fruit since they’re low in sugar, high in fiber, and fit well in the little pies. First, simmer 1/2 c. frozen wild blueberries in 1/2 c. of water with 1/4 c. honey til the berries are softened and the mixture thickens. Removing from heat, mix in 1 t. vanilla extract and two well-beaten eggs. Pour into pie crust, dividing between bowls if necessary. 
Adding Eggs
Bake at 350° for 10-15 minutes until almost set in the center and lightly browned. Let cool a few minutes, loosen edges with a knife, and cut into mini pie slices. Serve with a fork and top with dallops of cream cheese (a good low-sugar sub for whipped cream).
Blueberry Pie

Saturday, November 26, 2011

Basic Pie Crust 2

Gluten-Free Gourmet
Spreading Pie Dough
This recipe makes use of a second strategy for desserts: a small serving goes a long way. That keeps the amount of grain at a tolerable level. This recipe would cover about a third of a regular pie pan. I like to use three small, oven-safe glass bowls to make mini-pies; you could also use a six-inch glass pan. It’s important to spread the dough quickly in the pan so it doesn’t thicken too much. Also, you can’t really spread it up the sides since it will fall back down in the oven. Next, bake the crust at 350° for 10 minutes before adding the filling.

Friday, November 25, 2011

Basic Pie Crust

Gluten-Free Gourmet
Pie Crust Ingredients
With all this trekking around, I’m getting really hungry! The holiday season brings delicious desserts, but if you remove the wheat flour, sugar, milk, and nuts from traditional pies, you don’t have much left! Happily, there is an alternative. Here is a wheat-free, no-sugar pie crust that can be whipped up in minutes.
In a small bowl, combine 1/2 c. sifted rice/oat flour, 1/2 t. salt, and 1 T. canola oil. Stir in 2-4 T. water til the dough is wet and spreadable, but not runny.

Thursday, November 24, 2011

Running the Furnace

Ohio History
Stockyard
Not far from the charging shed stood this huge storage structure, which held the ore, limestone, and coal for the furnace. In a year, Buckeye Furnace used 8,000 tons of iron ore, 400 tons of limestone, and 12,000 cords of wood (burned down to make charcoal to power the furnace).
Samples
Besides this big exploitation of natural resources, workers were also treated very poorly. What meager pay they received for the long, dangerous workdays was not even real money, but “scrip.” It could only be spent at the “company store,” owned by the iron master, which inflated prices for everything. Thus workers often owed the store for even their own food. Not a little unlike the Southern plantations of that time!

Wednesday, November 23, 2011

Furnace-Below

Ohio History
Casting Shed
Now we’re standing in the casting shed (lower left in the last picture) at the bottom of the furnace chimney. After twelve hours, the molten iron would be drawn from the furnace into the casting shed, where it flowed into pig molds shaped in the sand floor. Then a “slag wheel” pulled a chain across the hot iron’s surface to skim off impurities, or slag. Once cooled, the iron logs were floated down the creek to be shipped away on the nearest railroad and used in industry. In fact, iron from these furnaces was used for weapons, especially battleships, in the Civil War.

Tuesday, November 22, 2011

Furnace-Side View

Ohio History
Buckeye Furnace From Below
Here is the furnace from the lower level. The charging shed, up on top, held the hot blast oven (right-hand chimney) which heated water boilers inside to power the air compressor engine. Meanwhile, the furnace itself (below charging shed) was loaded with layer upon layer of ore, limestone, and charcoal. The engine then pumped extremely hot air—600°—into the metals for twelve straight hours to melt the iron from the ore. The black, charred wood on the shed testified to months of intense heat—imagine what it was like for the workers!

Monday, November 21, 2011

Buckeye Furnace

Ohio History
Charging Shed
Now we’re jumping forward in time about 600 years, to the discovery of abundant iron ore and limestone here in the “Hanging Rock Iron Region” of Ohio. Buckeye Furnace is one of the few remaining iron blast furnaces which supplied the nation’s growing iron needs in the 1800’s. New communities grew around these factories: workers’ houses, school, church, store, and the iron master’s mansion. Nearly all is gone now except for the lonely-looking furnace. This top view shows the charging shed, where the raw materials were taken in to be loaded into the chimney stack.

Saturday, November 19, 2011

Leo Trail 2

Ohio History
Up the Gorge
Heading back up the steep ravine, the trail did not improve much. But the rock sculptures, like the “pancakes” above, were still magnificent. One rocky shelf extended so far over the trail that we could stand in the deep cavern. It was hard to believe we weren’t at Old Man’s Cave, except that there was absolutely no one else around!!
Marble Rock
Isn’t it amazing to think a rock could hold such a spectacular mix of colors? We got a good look at it while we were underneath that rock shelf I mentioned. There were also rocks embedded with pebbles and flint, and some had a honeycomb pattern eroded from their surface. Really, it is a shame more people don’t know about this awesome gorge!

Friday, November 18, 2011

Leo Trail

Ohio History
Fern Rock
Here are some shots coming down into the gorge. The hike down over slippery rocks was quite treacherous, and we considered turning back. I’m glad we didn’t!! The fern cascading over the rock above was one of the first marvels we saw. Compared to the rock ledges we were descending, this boulder was small (say five feet high).
Stream Below
Finally, we’ve reached the very bottom of the gorge, trickling with a small stream. The rocky wall was simply awesome as it rose fifty or sixty feet above our heads! The stone surface was covered with ledges, holes, and pancake-like layers. Tree roots and vegetation dangled over the edge as if hanging on for dear life; it was amazing how much plant life was flourishing in the rugged environment.

Thursday, November 17, 2011

Leo Petroglyph Trail

Ohio History
Rocks in the Gorge
The engraved rock at Leo Petroglyph was not the only thing to admire. In fact, the sandstone bedrock was not only exposed here, but also in the steep gorge nearby. Magnificent rock outcroppings extended from colorful foliage high above the gurgling stream at the bottom of the narrow valley. Autumn trees contrasted with tall pines as we hiked down the slippery trail on the side of the gorge. Imagine the force of the Flood waters as they cut out these beautiful sculptures in the rocks!