Only the best from a bulletin board full of experience in such varied interests as poultry, art, good food, and Ohio history.
Come along on the adventure!

Be sure to also check out ohloveofgeocaching.com for travel and caching adventures!

Monday, December 31, 2012

Another Fireplace

Artist's Gallery
Kitty by the Fire
 And, may I present, the next year's version of "the fireplace." Not quite as detailed . . . I wonder why? This is one of those leftover-paint cards that came toegther over several weeks of doing other paintings. That's why there's so much blue around the corners--I wouldn't do that again; it makes the picture feel cold and, well, not cozy or Christmas-y. And the plants look like tropical palm trees, not Christmas greenery. But I really like the wreath and hearth garland, and the cat adds some needed interest. You can just imagine he will be jumping down to play with those yarn balls in a minute!
 
PS: By the way, Happy New Years to all!

Saturday, December 29, 2012

Christmas Fireplace

Artist's Gallery
Christmas by the Fire
What's better than a chilly evening spent in front of a roaring fire? This is probably the most detailed Christmas card I've done; believe me, I only painted this scene once! It would make lovely prints, if I could get it to print out well . . . Anyway, I love how the yellow light is reflecting on the stone and hearth around the fire. Also that glowing shade of royal blue on the chair cushion underneath the cat. The texture on the grout around the fireplace stone was done with a dry brush technique, and the shadows on the rug are a watery gray/black mixture. I painted this card two years ago for my penfriend in Georgia; now I wish I hadn't sent the original away!

Friday, December 28, 2012

Birthday Duck

Artist's Gallery
Daffy the Duck
Happy birthday to my Little Sister! This year I painted her favorite duck, Daffodil (affectionately known as Dafffy) on her birthday card. Daffy is one of the three ducks we raised from day-old ducklings this spring; however, the other two are brown and much smaller. I don't think Daffy cares! It's so cute waddling around after them. Of course I had to include a tub of water in my painting--Daffy sticks to its pool like, well, a duck takes to water! What strikes me about this painting is how impressionistic it looks. And I didn't even intend that when I painted it with leftover colors on my palette. Just look at that brown tone showing through the blue water surface; the splotches and strokes of green paint on the bushes; even how the blue sky is dabbed in around the leaves . . . it's sad how the nicest things come about by accident!

Thursday, December 27, 2012

Shepherd's Pie

Gluten-Free Gourmet
Holiday Main-Stay
Christmas dinner wouldn't be the same without a hearty home-cooked casserole. Here is a wonderful dish, sure to please all your loved ones coming in for the holidays. Our family enjoyed this recipe for Thanksgiving, but it would be excellent for Christmas or New Years too. Here's the best part: you can prepare both the meat and topping up to 3 days ahead; on the holiday morning, just grab them out of the fridge and throw them into the pan!
To start, brown 1/2 c. chopped onion in 3 T. olive oil, in a large pan on medium-high heat. Add 2 pounds of beef (hamburger, chopped chuck roast, or your favorite cut of meat). Continuing to brown, stir in:
3 T. flour           1 T. fresh ginger, minced               2 garlic cloves, chopped
2 t. ground cloves             2 t. chili powder                    1 c. pitted prunes, chopped
Once the meat is about half browned, stir in 1-2 c. of chicken broth (or water), just covering meat, and simmer on very low for 1-2 hours.
Optional: blanch 10 oz. of pearl onions in boiling water for 2 minutes. Drain, peel, and add to the beef stew. NOTE: We did not do this since we could not find pearl onions at our supermarket. It was fine without, though I imagine it'd be even better with!
Meanwhile, peel 2 pounds of red potatoes and 1 pound of carrots; chop in 2-inch pieces. Place in a pan of water with 2 T. salt and boil til tender. Drain and mash. Then stir in a heated mixture of 1 c. whole milk and 1/4 c. butter. Here is the point at which everything could go into the fridge until Christmas morning.
To assemble the casserole, spoon the stew into a 9x13 glass dish. Cover with the vegetable mash, then sprinkle with 1 1/2 c. grated gouda, gruyere, or sharp cheddar cheese. Bake for 40-50 minutes, or until bubbling and golden. Dish out and enjoy!

Tuesday, December 25, 2012

Merry Christmas!

Artist's Gallery
Christmas Peace
"In Him was life, and the life was the light of men.
And the light shines in the darkness,
                                         And the darkness did not comprehend it."                             John 1:4-5
                                                                                                                
And now may I wish all my dear readers a blessed Christmas and a wonderful New Year! This painting seems to be a perfect picture of this wonderful verse. You could call this my theme card for the year; I did four assembly-line-style cards to send to our friends and relatives. Each one came out a bit different, but the meaning is still the same! Merry Christmas!!

Monday, December 24, 2012

Winter Bird

Artist's Gallery
Snowy Christmas Card
 This cheerful little bird is also from this year. Painting all that snow was the fun part--I added some blue and red at the top, gradually tapering off to all white at the bottom. The stick, painted once the snow was dry, wasn't too bad either. The worst part was putting the snow on the branches; I found out that it's harder than it looks! The paint was either too wet and clumpy, or too dry and didn't stick (does this sound at all like snow itself, when you're trying to build a snowman??). I actually broke all artists' rules and copied this picture just like I saw it on a Christmas card in a pack we found at the dollar store.

Saturday, December 22, 2012

Candlelight Christmas

Artist's Gallery
Candle 2012
And . . . this year's version of the candle. That bowl of blueberries only got away on one card! A simple mug works very nicely. And adding the red curtain really balances the candle. I painted two copies of this card simultaneously, one of them for my art teacher--I'm waiting to hear his critique of the painting! Last year I actually set up an assembly line, doing four cards at the same time. In fact, you can see one of them here; can you spot the differences between it and the one above? I realized, after the cards were in the envelopes, that I forgot to paint in the snow piled on the window frame ledges, and the falling snowflakes! Oh well, I guess the blizzard is already over this year! Which of the two cards do you like better?

Friday, December 21, 2012

Candlelight: Acrylic

Artist's Gallery
Painted Candle
Here is my next candle Christmas card, painted in acrylics this time. I decided the lone candle was too plain, and added a steaming mug of hot chocolate and . . . what is that? . . . a bowl of blueberries! I think I must have had a lot of leftover blue paint or something! I like the greenery woven around on the table, as well as the vine in the upper corner. This card is from two years ago I think. I kept improving the design each year; stay tuned for this year's picture!

Wednesday, December 19, 2012

Candlelight: Pencil

Artist's Gallery

Early Christmas Card
I apologize to all for missing so many days of posting. Lately I have been kept very busy painting what seems like a zillion Christmas cards! To get into the spirit of Christmas, I'm going to feature a series of cards that I've painted both this year and in previous years. This one is probably the first Christmas card I ever did, and it's actually in colored pencil. Except for the snowflakes outside the window--can you guess what they're made of? Yes, none other than white-out! (It actually works pretty well!) I can't imagine how long it took me to draw in all that wood grain and shade the shutter. I don't think I'd have that much patience now, anyway!

Monday, November 26, 2012

Good Old Acorn

Backyard Poultry
Acorn in the Nest Box

And...innocent little Acorn stands by watching as this all unfolds. For some reason it never lost any back feathers; Puzzle seemed to think it was too little and should be left alone, or something! Acorn didn’t lay often, so it was always a treat to see it in the nest box. It puffed up like a teddy bear and looked so innocently at you! Maybe this was because it was an Araucana Easter-egg layer, but did not lay blue eggs! (We got the unusual case of “pink” eggs instead of blue—you can see one under it.) But Acorn was still an awesome chicken, and I wouldn’t have traded it for anything.

Friday, November 23, 2012

Dancing Hens

Backyard Poultry
New Saddles
This is such a funny picture! I took it right after we finished putting the saddles on. Cherry, the Rhode Island Red, seems to be helping Midnight out with her saddle! I read, in the same book where I found the saddle pattern,
Your hen may do unusual dances trying to get the saddle off her back.
Please respect your hen’s dignity and do not laugh at her.
I thought, "How could you really laugh that much at a chicken?" but now I understood! Some of the hens went wild trying to 1) get really short to get out from under their saddles, 2) throw them off with excessive wing flapping (which sometimes was successful), or 3) rip the elastic in two by with their beaks. All the chickens below are trying one of those methods. I don’t blame them, they weren’t used to wearing “dresses” (as some of our neighbors have called them!).
Red Saddle, Blue Saddle

Thursday, November 22, 2012

Happy Thanksgiving!

Artist's Gallery
Fall Harvest
May all my dear readers have a wonderful Thanksgiving this year! As you probably guessed, yes, I have even painted Thanksgiving cards! This is a fall scene I just made up from my head, and we sent it to my grandparents a few years back. After all, what more could you be thankful for than a plentiful autumn harvest? And of course, be sure to enjoy a piece of delicious pumpkin pie--there's a great recipe right here! Happy Thanksgiving!!

Tuesday, November 20, 2012

Blue Saddles

Backyard Poultry
Denim Saddles
Now the Barred Rocks are in style too! Beside the pink saddles, we made some blue ones, out of regular denim, with the same method. In this picture you can see the topstitching across and up-and-down on the saddles, which makes them lay down better. We put all the pink ones on the Rhode Island Reds, and blue on the Barred Rocks, as if they matched somehow! These two chickens are Peeper and Midnight, enjoying some carrot peels we threw in the run.

Sunday, November 18, 2012

Putting Saddles On

Backyard Poultry
Saddle Operation
Making the saddle was one thing; putting it on the chicken was a different story! After showing the hen its new coat, we got the hen in a very tight grip. One person had to pull out each wing while another slipped the elastic over it (without catching on the feathers). Meanwhile the hen squirming and flapping and trying to get away from this “thing” attacking it! It started out as at least a three-person operation! The one trick was holding a cup of scratch right in front of the hen’s beak which distracted it a little bit at least. Here is Pepper trying to decide between an enticing cup of scratch and that strange blue thing on its back!

Friday, November 16, 2012

DIY Chicken Saddle

Backyard Poultry
Saddle Supplies
Of course, you can buy pre-made saddles for your chickens, but, as always, I wanted to make them myself. It turned out to be pretty easy with my sister’s help! I found a pattern in my poultry book, and then we measured the chickens and tweaked it a bit. Next we cut two layers per saddle out of a heavy denim fabric, and one piece out of thin quilt batting. Then we sewed all three layers together, except we left the whole top area (with the curved edges) open. After turning it right side out, we sewed the top shut, but first inserted little pieces of 1/4” elastic to make little loops on the curved edges. These held it on the hen’s wings. I know it sounds complicated, but hold on til I show the chicken wearing it...

Wednesday, November 14, 2012

Saddle Solution

Backyard Poultry
An Easy Answer!
Research revealed that there is an easy solution for such feather issues: it’s called a chicken saddle (or chicken apron, if you like). It protects their backs from the roosters’ feet and spurs, and lies neatly under the wings and neck feathers. Here you can see Buckeye demonstrating the new look...do you think Maple may be a little jealous? It’s true, some chickens lost more feathers than others; either they were Puzzle’s favorites (getting most attention), or they were on the bottom of the pecking order (making easy targets). Coming right up...Make your own chicken saddle!

Monday, November 12, 2012

Feather Issue

Backyard Poultry
Feathers Disappear from Hens' Backs
Well, are you ready to hear about our next chicken woe? As I noted in my last seres, this issue involves Puzzle. To be expected (though we didn’t know it), our rooster was gradually tearing out our hens’ back feathers in the process of mounting them. At first we thought this was some kind of new feather coloring on our hens (the first we called the “granny hen”—yes, we were really that ignorant!), but some research showed differently. Here you can see the missing feathers on our hens’ backs (white down feathers are showing through). It can be a lot worse than this—get down to exposed raw skin, and I’ll let your imaginations do the rest!

Tuesday, November 6, 2012

Daisies & Fruit

Do-It-Yourself Decorating
Finished Daisy Bouquet
What do you think of the finished bouquet? I think it all came together nicely. Wish I had a picture of the original green can to show you! I like how the dark purple balances the daisies and creates interest in an ordinary arrangement. The pink and yellow match the ceramic colors quite well too—and I didn’t even plan that! This will be one arrangement to keep for a good while.

Sunday, November 4, 2012

Colorful Fillers

Do-It-Yourself Decorating
Adding Purple Flowers
Now for the filler flowers… There were some deep purple bunches of flowers in the original bouquet, as well as little baby-pink blossoms. The purple ones contrasted nicely with all the lighter flowers, so I tried to distribute them around the bouquet. The pink ones also seemed to fit right in, though there were only a few bunches of them, so I spread them out as well. It’s kind of fun to work from a pre-selected bunch of flowers, so that all you have to do is decide where to put things! Would you add anything else to this arrangement?
Almost Done?

Thursday, November 1, 2012

Adding Moss

Do-It-Yourself Decorating
Covering up Foam
Oops, I think I forgot something! We don’t want that green foam sticking out of our finished arrangement! Moss should take care of that. I wrestled out some moss (a real battle, it’s so tangled up) and spread it in around the flowers. It actually was a bit easier to add it with a few flowers already in there. The stems helped hold it in place.
There are all different kinds of filler moss. The one I’m using here is like little pieces of dried stems almost (or the synthetic equivalent); at home I’ve used real moss like you get for miniature dioramas; even Easter grass could work. And then there are always a variety of colors to choose from—pick what you like and what fits your flowers! PS: See more about moss here.

Tuesday, October 30, 2012

Daisy Bouquet

Do-It-Yourself Decorating
Beginning the Arrangement
I didn’t have flowers in mind when I bought this cute little ceramic bowl. But we had bouquet around in the ugliest green-painted tin cup you could imagine; so, I decided to try and give the flowers a face lift. To start with, I cut and fitted a piece of floral foam into the crock’s mouth. Then I cut—or rather gnawed—apart the original bunch of flowers (they turned out to be mostly wire) and surveyed the assortment. It seemed the daisies should be the focal flowers, so I spaced them out evenly around the sides and top of the foam. And the leaves came right along!

Sunday, October 28, 2012

Amazing Brownies

Gluten-Free Gourmet
Dig in!
Did you think brownies were something you’d have to give up if you went gluten-free? Well, not any more, with this amazing, no-wheat recipe that my sister perfected! Even with a small amount of chocolate (reducing the carbs and other unwanted things), it still came out very rich. And then there’s the secret to that pink icing, we’ll get to in a minute!
Combine and microwave on high til melted, stirring to combine:
1-2 ounces bittersweet chocolate (depending on your taste), chopped in small pieces    
1/4 c. butter                          1 T. cocoa powder
Next, whisk together in a bowl:
1/2 c. honey                  1/4 t. salt                   1/2 t. vanilla extract
melted chocolate mixture   
Add 2 eggs, mixing after each. Last stir in 1/2 c. sifted oat/rice flour and 1/4 t. baking powder.
Spread the batter in a 7x9-inch glass pan (or something around that size), lined with foil and greased well. Bake for 25-30 minutes, til just set in center.
For the frosting, combine:
1/2 c. cream cheese                 1/4 c. honey                  1/2 t. vanilla
1/4 c. blackberry jam
(Can you guess which ingredient lends that gorgeous purple color?)
Beat with a mixer til very smooth. Gently spread over brownies while still warm.
Pretty Purple Frosting
Of course, you can use cocoa powder instead of the jelly for a more traditional icing. Both are delicious, of course.
This recipe makes a very small pan on purpose. Since it’s still a bit heavy with carbs (the chocolate and all), we like to give out pretty small servings at once. They’re so good, a little bit goes a long way! Enjoy!

Wednesday, October 17, 2012

More Flowers

Artist's Gallery
Colored Pencil Lilies
Here are a few more flower drawings to compare. I always find it interesting to see the differences and similarities between colored pencil and acrylic. Both these pictures were drawn on cards. I sent them both to two different of my pen friends who lived in Germany as birthday cards. I even made a little clay tea set to send with the card above, which cost me more to mail than to make... But my friend loved it! Please don’t even ask if I drew these from imagination—never. I went through a flower bulb catalog and picked out blossoms from there to draw: tulips, lilies, and bluebells. Flower seed and bulb catalogs are always a great source to draw from if they have a lot of nice pictures! I especially love the new multi-colored tulips they’ve come out with.
Birthday Bouquet

Tuesday, October 16, 2012

Sunflower Trio

Artist's Gallery
Sunflowers Three Ways
On the note of summer flowers, here is an interesting study (not quite like Van Gogh’s sunflowers!). I did all these pictures from the same photo I took of a sunflower in our yard. However, I used different media for each. The top one on the left side is colored pencil, below that is acrylic, and the right hand painting is watercolor. They’re all done on plain paper, but the acrylic one is a card. In fact, you can see it up close right here in an earlier post. It’s very interesting how similar the colors came out in each version, but the effect is different depending on the medium. I think the acrylic is brightest, while the colored pencil is very blended, and the watercolor seems most realistic. Which painting do you like the best?

Sunday, October 14, 2012

"Long Summer Days"

Artist's Gallery
My Painting on the Calendar

Yes, my painting is on the calendar! Just a note here, thanks to my family for generously helping out with most of the votes for it (“loading the ballot box” as one of my artist friends put it!). Still, I thought it was a beautiful representation of our rural county, right down to the title, “Long Summer Days on the Farm.” And July is the perfect month to display it on! I like it with that black border...maybe I should try a black frame?… Of course we bought several calendars, and I will always treasure this picture, even when the calendar's months are over.

Friday, October 12, 2012

Calendar Contest

Artist's Gallery
Gallery Calendar Featured Pictures
Last year, I had the opportunity to share my painting “Summer Evening.” Our local art gallery was planning a 2012 calendar to sell. They decided to have a competition among local artists for the pictures that would appear on it. A couple dozen pictures were entered that were somehow related to our county—scenes from parks, farms, fields, downtown streets and houses, and even a photograph of the courthouse. Through the month, gallery visitors voted through their donations for the pictures they liked best, and at the end of the month, the twelve winners were chosen. I couldn’t wait til the deadline to see if they had picked my painting! Here is a sneak peak at all the paintings which won...do you see mine there?

Monday, October 8, 2012

Summer Set

Artist's Gallery
"Summer Afternoon" & "Summer Evening"
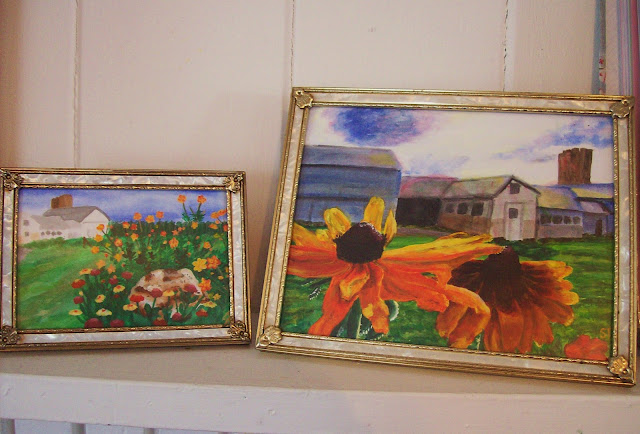
Now we can compare both paintings side by side. I found matching white-marbled frames with gold trim that fit them, and I liked the lighter color rather than the gold I showed earlier. They made a perfect set, sharing the same barn motifs and bright summer colors, with just enough variation too. I like how the flowers are so big in the larger painting, and very small in the little painting. Really, you have to do at least a two-painting set when they’re this small size, so they don’t get lost on the wall when they’re hung up. At least that’s what I found when I tried to decorate my room with a dozen of my 8x10 paintings!

Sunday, October 7, 2012

Cosmos Photo

Artist's Gallery
Reference Photo
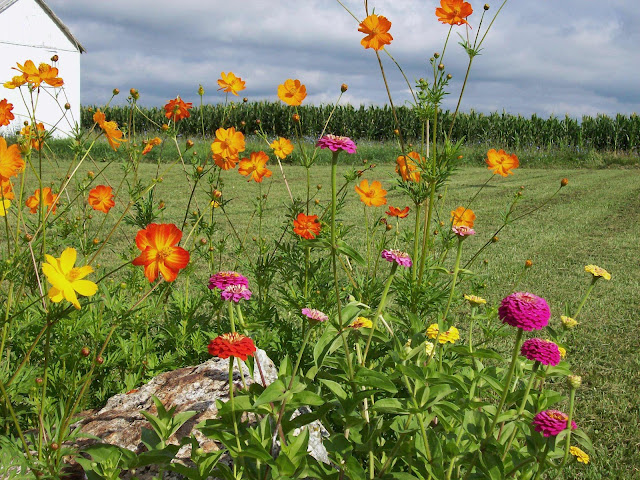
Here is the photograph I painted "Summer Afternoon" from, only a bit different view...I think it got cropped or something. But don't you see the same look in the sky, like just before a summer thunderstorm? And yes, there's a good old corn field below. We grew the zinnia and cosmos flowers here the year before I planted the black-eyed Susans in the other painting, "Summer Evening."

Saturday, October 6, 2012

Summer Afternoon

Artist's Gallery
Framed Painting

Here is the sister painting to “Summer Evening.” Same barn, same background, but a smaller scale—this painting is only 5” by 7” instead of 8x10. I still remember, this was the painting I worked on the first day I went to my art group. Everyone else was painting much larger canvases, and I felt very outnumbered!
Like “Summer Evening,” I painted the background first, watercolor-acrylic style. I think the dark, thunder-stormy look of the sky and the brown splotches in the grass give it that late-summer look. When dry, I applied thick, bright paint for the flowers and rock, covering over the background colors. I think it’s a cute little picture!

Thursday, October 4, 2012

Summer Photo

Artist's Gallery

Original Photograph
And now, you can see the original picture I used to copy. Time for the critique: how does it compare to my painting? . . . Or rather, how does my painting compare to it? I believe I took the photograph myself, in front of the old barns right on our property. And the black-eyed Susans were grown from seeds sent by my penpal from Georgia! For that reason, and because it just seems like the essence of a farmer's life, I will always treasure this painting. Oh, and also because it won the Art Guild's calendar contest--more about that in a minute!

Wednesday, October 3, 2012

Summer Evening 2

Artist's Gallery
Gold Frame
So how do you like my frame? I actually found the frame before I painted the picture, so I could cut the cardstock to the right size before starting. This was back before I was taking any art instruction, and later one art teacher told me I should have added white to the yellow on the flowers to make them brighter. The yellow paint, even if applied straight from the tube, just could not be as brilliant as I wanted—and I never thought of adding white! See this technique demonstrated on my other flower painting, Fireworks, right here.

Monday, October 1, 2012

Summer Evening 1

Artist's Gallery
Barns & Black-Eyed Susans
Well, it’s not winter yet, and here is a painting to celebrate these last days of summer we’ve been enjoying. I did this one two years ago in July, in the dead heat of summer! I still love the whole composition, old barns with country flowers catching rays of sun from an early-evening sky, though now I see ways I could improve how I painted it.
Regretfully, I don’t have step-by-step pictures, but here’s a brief overview of how I painted it. The barns were done in watered-down acrylic paint, hence the watercolor effect, which doesn’t distract from the foreground. I really layered the paint onto the flowers, shades of golden yellow, lemon yellow, yellow-orange, and maroon, to try and shape the petals. I mixed extra yellow into the grass greens to reflect the sun, also echoing it in yellow washes on the barn roofs. I wasn’t really happy with how the sky came out, the clouds are such a dark blue they look like storm clouds almost. The problem was using ultramarine blue, which just doesn’t mix with white that well, but I had no other blue at the time. But I still love the painting. Coming soon…“Summer Evening” finished and framed!

Sunday, September 30, 2012

Winter Chickens

Backyard Poultry
Afternoon Sunshine
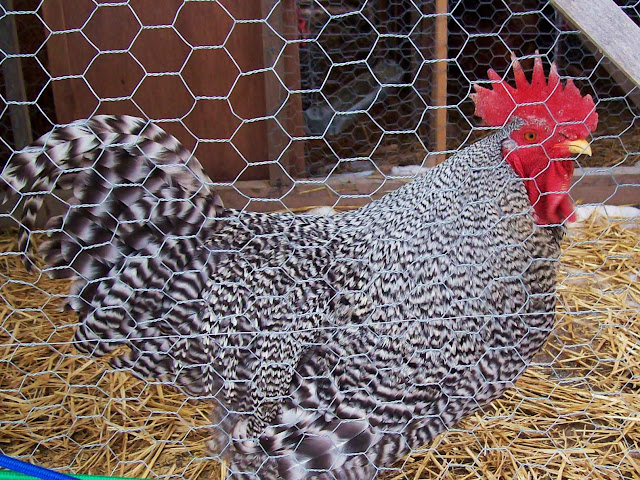
The roost was the lifesaver for many long days spent penned up indoors by the snow. It even got the afternoon sun through the window, and I always liked the peaceful scene of the hens enjoying the winter sunshine. Of course, the view was always through the wire covering the door, and that’s what those funny lines are in this picture. Really, watch out if you enter that house, since Puzzle will be coming at you with a sharp beak in no time!
Puzzle on Patrol
Yes, Puzzle was beginning to get even more aggressive, shut in that little house so much. More aggressive toward us, but more protective and bossy toward the hens. We actually began having to separate the rooster in its own run on the nicer days, since it was just getting to be too much for the hens. They got nervous and more aggressive to each other with that huge rooster around. We loved our Puzzle, and were sad to have to separate it, but something was going to have to be done about the issue.

Friday, September 28, 2012

Unusual Eggs

Backyard Poultry
Winter Eggs
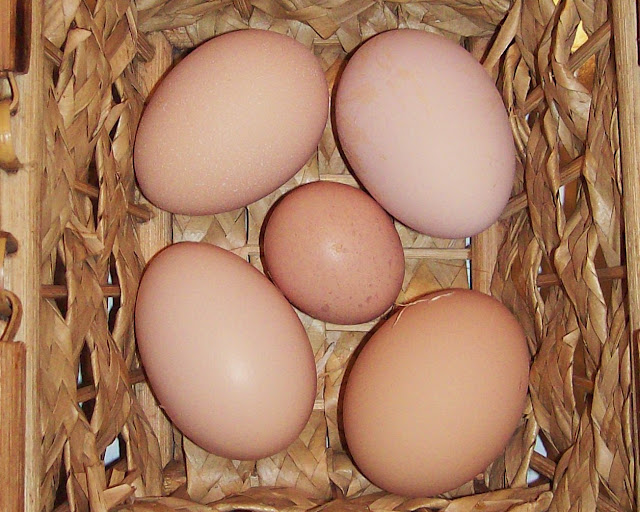
As a chicken raiser soon finds out, not all eggs are created equal. Even from regular layers you can get odd eggs, and our hens were no exception. This little one, in the middle of the basket, was only the size of a sparrow egg! Through the shortening days of November and December, our chickens kept up laying very well: around 13 dozen a month (a lot for us!), averaging out to about 5 eggs a day from the 8 hens. This is really unusual when you have only 8-9 hours of daylight each day; I think it was the many extra treats that did it! Since this time I have seen many more unusual eggs, including a number that were laid shell-less or soft-shelled, causing them to sadly disintegrate before making it into the egg basket.

Tuesday, September 25, 2012

Winter Treats

Backyard Poultry
Wet Mash Snack
As I said before, even three nice warm runs do not keep 9 chickens busy, and we know what mischief idle chickens find to do! Giving the hens special treats was one good answer, especially since it also increased egg laying (AND cost). We discovered that chickens like to eat almost anything, but wet mash (layer food) proved an easy favorite. Here you can see cute little Acorn reaching for some mash. I would also fix the mash in old plastic quart containers.
Attacking the Corn!
 Last summer I had grown a bunch of Indian corn in the garden, and the chickens loved to eat it. At least once they got over being scared of the red, purple, and blue kernels—it was so funny to see them cluck and stare at the corn like it was some enemy! Other treats my hens liked included cooked potatoes, leafy greens, frozen peas, and cabbage—see a video of the cabbage here!!
Sunday, September 23, 2012

Winter Water Works

Backyard Poultry
Water Pail
If you live any place that can stay below freezing for days on end, you’re sure to be wondering how our hens had drinking water all winter. Well, after some trial and error, we devised the system shown above. We used interchangeable small metal buckets that fit down in a wooden frame, which in turn was attached to the coop wall at hen-eye level. It was then very easy to pull out one bucket frozen with ice and replace it with a pail of warm water. The chore then was facing the 30-mph icy winds and 12”-deep snow to get the warm water out there! Normally changing it every morning and evening kept the water thawed, except for very cold days when we had to go out midday as well. We sure got plenty of fresh air that winter!

Saturday, September 22, 2012

One Last Run!

Backyard Poultry
Side Runs on Coop
Here are the other runs with their tarp and straw bales. The tarp is fastened to the shed (chicken house) wall using ferring strips, about a foot above the tops of the runs. Then there’s a long 2x2 pole on the opposite edge of the tarp, weighting down that edge to hang over the runs. It worked well, with the same drawbacks as the other run, except it was very easy to remove—just roll it up! Also, it didn’t block out light into the house like our original plan (see it here), since it was attached below the window. The straw bales worked also quite well to shelter the runs’ sides, even leaving a little peephole for the hens.

Thursday, September 20, 2012

Winter Poultry Runs

Backyard Poultry
Tarp-Covered Run Against Pophole Door
Want to see our chicken run tarps in action? Observe, there is snow all around, but not on the heavy-duty tarp nicely protecting the run. And underneath are the happy chickens enjoying dry dirt to stretch their legs on! Oh, and for insulation, there are a couple straw bales under the tarp too. The crates of rocks hold it down in strong winds, along with our handy-dandy bungee cords! Yes, this system did work pretty well, just a couple catches: 1) must keep snow swept off to less than 1/2” or it will freeze rock-hard, 2) cannot access dirt or chickens inside run without a half-hour operation on tarp, and 3) chickens get a tiny bit bored cooped up on 20 square feet of frozen dirt. But, as I said, it worked well enough!

What Does Puzzle Think?

Monday, September 17, 2012

Summer Salad

Gluten-Free Gourmet
Rainbow Veggie Salad
Nothing gets closer to the taste of summer than this peak-of-the-season salad. It features all the wonderful vegetables you can find in the garden or farmer’s market, literally a rainbow-colored salad. I’ll leave it to you to pick out each color in the salad! (Hint: There’s just one color missing: blue.)
Now some don’t like raw carrots or squash in salad, but the key is to chop them very thin and flat, stir fry style. You can see what I mean in the picture. Well, let’s get started! This salad is very simple to throw together. Just chop and mix in a large bowl:
1 head Romaine or green leaf lettuce, soaked in ice water and chopped roughly   
2 carrots, thinly sliced                1/2 yellow (summer) squash, thinly sliced   
1/4 c. raisins                              1 chopped ripe tomato
For the dressing, combine in a jar:
1/2 c. oil                          1/4 c. water                          2 T. honey 
1 T. Dijon mustard              1 T. white wine vinegar          1 t. basil
Shake well and pour over the salad.
A hint of sweetness from the raisins makes this colorful, crunchy salad a top winner! Try it, and tell me what you think!