Only the best from a bulletin board full of experience in such varied interests as poultry, art, good food, and Ohio history.
Come along on the adventure!

Be sure to also check out ohloveofgeocaching.com for travel and caching adventures!

Saturday, March 31, 2012

Birthday Bouquet

Do-It-Yourself Decorating
Original Flowers & Vase
This flowery centerpiece decorated my birthday table--a pleasing arrangement for a glass vase. (Thanks to my mom for a nice job on it!) But what do you think I could do with it given a nice container and some floral foam?
Finished Bouquet
How about this? It wasn't easy deciding where to put each kind of flower! I started out with the single red carnation in the top center, surrounded by the stalk of orange lilies. The white and pink lilies formed two rings underneath those, with the yellow daisies in between. I also added in those purple and red tulips from our flower beds outside--we picked them since we had a freeze warning and have enjoyed watching them open!  What do you think of the arrangement? Next time I might try interspersing the orange lilies into the lower levels more. I just love the color of those marbled pink ones!

PS: See another arrangement I did in this same ceramic pot here.

Friday, March 30, 2012

Caesar Salad

Gluten-Free Gourmet
Salad Ingredients
This mouth-watering salad could easily stand alone as a light summer lunch. It would also be a perfect side dish for a vegetable soup. Top it with gluten-free croutons if you can find them. Toss in a salad bowl:
1 head Romain lettuce, coarsely chopped
1 tomato, diced
4 hardboiled eggs, peeled and chopped
1/2 lb. sliced lunch meat, cut in squares
1/2 lb. sharp cheddar cheese, diced in 1/2" cubes
The dressing is simple:
1/2 c. canola or vegetable oil             1 t. dried fennel or tarragon
1 t. dried basil                        1 t. mustard                        2 t. honey 
Shake up in a jar, pour over salad, and toss.
Caesar Salad
Spoon out and enjoy! This recipe will serve 6-8 people. The eggs, cheese, and meat can be prepared ahead of time, but chop the lettuce and tomatoes within an hour of serving. I like to break apart the lettuce head and soak the leaves in an ice bath for a couple hours beforehand get them nice and crisp.

Thursday, March 29, 2012

Birthday Feast

Gluten-Free Gourmet
Birthday Feast
What is a birthday without some special munchies to go with it? I planned quite a feast for my birthday this year! Including a few foods outside of the low-carb list, but as I've said before, it's okay once for us in a while! First on the menu were roasted veggies--potatoes, acorn squash, carrots, and sweet potatoes, drizzled with a mustard sauce which was perfect. I've always wanted to have tacos, (a no-no cause of the corn), which were yummy with hamburger, refried beans, lettuce, and tomato salsa. There in front is the Caesar salad, also delicious. I'll be giving you the recipe for that in my next post!
Fruit Fiesta
Time for dessert! Underneath that painstakingly arranged fruit is a layer of cream cheese and oat/rice crust. I drizzled some hot apricot preserves over the peaches, strawberries, and bananas to finish it up. I must admit, everyone was too stuffed after the meal and cake for dessert! It's still sitting in the fridge untouched! Something to look forward to, I guess...

Wednesday, March 28, 2012

Birthday Treat

Artist's Gallery
A Birthday Bouquet
I received this beautiful hand-made card to celebrate my birthday today! My little sister drew it using watercolor pencils. These are like colored pencils, but you can wet the lead after coloring and it runs like watercolor. She got some amazing blending on those tulips! Thanks to all my family for making today a very special birthday for me!!

Tuesday, March 27, 2012

Lily Basket

Do-It-Yourself Decorating
Silk Flower Arrangement
How do you like this bouquet? It's my first with silk flowers, and I'm pretty happy with it. I chose the colors to match our living room--the one we've been working on redecorating. It really pops with the sofa cover! (See the sofa here.) The red lilies are the focal points, complimented by the yellow flowers. The blue hydrangeas were originally one big flower, and I had to cut them apart to make suitable filler flowers. The lily bud on top adds an interesting touch. Of course, I will be posting a picture of the basket in our finished living room later on!

Sunday, March 25, 2012

Fresh Flower Pot

Do-It-Yourself Decorating
Daisies & Carnations
I did this fresh flower arrangement all on my own. I'm pretty pleased with it! At first I did all the flowers too tall, and had to keep pushing them in til they covered all the foam. That's a special kind of foam called Oasys foam--it actually soaks up water so the flower stems stay wet. It's used for all fresh arrangements. After cutting the foam to shape, I got it wet (it gets about ten times heavier!) and set it down in the vase filled with water. My grandma gave me that container, and it happened to match the bouquet perfectly! Those little blue silk flowers added just the finishing touch.

Saturday, March 24, 2012

Flower Arranging

Do-It-Yourself Decorating
Fresh Flower Arrangement
Well, here's for a little diversion before I start in on some more poultry pictures. My mom and I have been taking a little class on arranging flowers, and here's one of my first projects. Well, the instructor actually did most of it, using this cute little china teapot. That's the lid in front, with a tiny butterfly on top! We learned how to cut down all the flower stems, strip the leaves off, and stick them into the foam in the middle of the vase. Those purple flowers are actually dried, and compliment the fresh daisies and lilies nicely.
I put this under DIY Decorating for now, since you can quickly (and cheaply) brighten up a room with a flower bouquet--even in coordinating colors! Silk flowers are coming soon!

Thursday, March 22, 2012

Wooden Footbridge

Artist's Gallery
The Old Wooden Footbridge
This is my last painting from the Fast and Fun Landscaping acrylics book. It’s got a lot going on! I started with a textured yellow background again, then blocked in the grass with a scrubby brush. The trees took shape under fan and scrubby brushes double-loaded with greens, oranges, and reds. Next I put the stream in (have you ever seen a creek that shade of blue??), with a darker stripe for the bridge shadow. I sketched the bridge in with paint, rather than pencil, filled it out with brown, and added a railing on top. I like how the lower arc came out, but not the top—it’s lopsided!
Donna Dewberry’s book also had several demos on painting a continuous scene across two, three, or even four canvasses, like a mural. They hung side-by-side or in a window-pane formation. These paintings didn’t need frames as they were just mounted on the wall. Although I didn’t do any of these projects, they gave me the idea for a painting I would soon do: my two-canvas farm scene “Autumn Pastoral.” This book sure hit the spot with my style of painting! I’d love to own it someday.

Saturday, March 17, 2012

Everglades Sunrise

Artist's Gallery
Sunrise in the Everglades
The river, dark from midnight sleep,
Now mirrors lines of radiant glow,
From morning clouds of brilliant gold,
That with the rising sun’s rays flow;
While leafy palms and cypress bows
Clad in magnificent attire
The ever-widening path of glass
On which advances the ball of fire.
Writing this poem was almost as fun as painting this dynamic scene from the Everglades. I started with the sky, putting down lots of yellow and white with a palette knife. It’s very textured, and almost glows! The cypress “knees” were done with a flat brush, then smudged with white. A double-loaded fan brush did good palm and cypress trees. I also used a fan brush for that interesting lichen hanging from the branches. The water is a striking progression from navy to lemon yellow; it’s so roughly blended that it looks almost impressionistic. This is my favorite picture from the acrylic book—I love the contrast between dark and light, close-up and far away. It would be something to see this sunrise in person!

Friday, March 16, 2012

Tropical Island 2

Artist's Gallery
Adding Trees, Sand Bar, Reflections, and Waves
I love how the waves came out on the right-hand side of this painting. There’s actually a touch of brown mixed into the blue, which gives the realism of shallow waves washing over the sand bar. Those tiny flowers couldn’t have been easier—I used a scrubby brush, double-loaded it with white and pink (or yellow), and dabbled it around the greenery. (See another use of the scrubby brush here.)
Really, I could go on and on about this painting, but let me just talk about the trees yet. The book had a really cool method for palm trees. You take a fan brush and load it with dark green, then just touch it in white or yellow (this is double-loading). Starting at the center of the tree top, you draw out the brush in an arc down into the palm fronds. A few sideways strokes make some good dead leaves too. The shorter palms were done with a flat brush, but using a similar method. This tropical scene was a lot easier than it looks, thanks to the easy methods in Fast and Fun Landscaping!

Thursday, March 15, 2012

Tropical Island 1

Artist's Gallery
Tropical Sky Background
That’s some wild sky, isn’t it?! This is the beginning of a tropical ocean scene. The book showed how to use a sponge to get those unique blends on the clouds, then finish up with a brush. It is really difficult to get the right touch with clouds. And the water came out with a nice feeling, even though it doesn’t quite feel tropical! You’ll see, it will all come together on the finished painting!

Wednesday, March 14, 2012

Birch Reflections

Artist's Gallery
Birch Trees by Water
My favorite feature in the Fast and Fun Landscaping book was its clarity: color pictures showed every stage, step-by-step, of every single project. I did at least half of the twenty paintings in the book, and learned a lot from each one. These birch trees were really interesting to paint, with the dark triangles where bark is peeling off. I painted the reflections at the same time, only a little lighter (and upside down!). Following the directions, I put a white wash on the lighter side of each trunk when they were dry. They look like they’ll jump off the picture! And those leaves are done with a fan brush again. This is a great method for painting trees—and that’s one of my toughest subjects!

Tuesday, March 13, 2012

Sunset Silhouettes

Artist's Gallery
Simple Sunset Painting
When I was first getting into acrylics, I picked up an excellent book at the library called Fast and Fun Landscaping with Donna Dewberry. Although I’d never watched Donna Dewberry’s TV painting show, I loved this book. It really shaped my acrylic technique, and I discovered a style I really enjoy. She uses a relatively new high-definition acrylic paint (that means it’s thicker and stands up more). I actually used cheap Wal-Mart poster paint, which didn’t have quite the same effect, but I still learned a lot.

This is the very first (and easiest) project from the book. Following the step-by-step example, I used a sponge to streak red, orange, and yellow paint across the sky, put in the sun, and added some more red clouds. The tree silhouettes are made with a fan brush. And the foreground was supposed to be applied with a palette knife and be very textured. My plastic color-mixing knife and runny black paint didn’t do quite the trick!!

Monday, March 12, 2012

Snowshoe Rabbit

Artist's Gallery
Snowshoe Rabbit
Well, we’re not switching gears too much to look at a few of my own art pieces! I did this paint-by-number when I was eight years old. The many shades of blue and brown on the white coat have always intrigued me, and I think the subtle touches of red contrast very nicely. I did several paint-by-numbers at that time—astronauts on the moon, a puppy and soccer ball, and a beautiful one with dolphins jumping at sunset. I also composed this poem to go with my Snowshoe Rabbit painting when I was eight:

All creatures great and powerful,
All creatures great and small,
There's none like the snowshoe rabbit
That changes in the fall.

 In the spring it emerges
A shade of rustic brown;
 In the winter it shows up pure white,
Like a wedding gown.

Saturday, March 10, 2012

Birds Snowflake

Ohio History
Birds of the Air
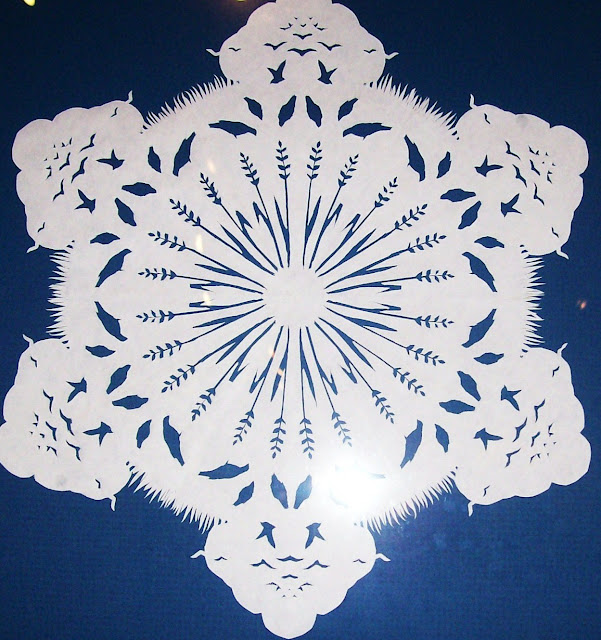
Look at all the birds on this one! I never thought there were so many different silhouette shapes for birds!! This snowflake must have been a difficult one—can you imagine cutting out those tiny stalks of wheat? The detail sure is mind boggling on this one. It comes from Matthew 6:26:

"Look at the birds of the air, for they neither sow nor reap nor gather into barns;
yet your heavenly Father feeds them.
Are you not of more value than they?"

Friday, March 9, 2012

More Snowflakes

Ohio History
Treasures in Heaven
I like the little moths in the center of this snowflake. It’s one of the more complicated patterns, with trees and people around the outside, topped by stars. You can spend quite a while studying any of the snowflakes, and more pictures will pop out! This one represents Matthew 6:19-20:
“Do not lay up for yourselves treasures on earth,
where moth and rust destroy and where thieves break in and steal;
but lay up for yourselves treasures in Heaven,
where neither moth nor rust destroys and where thieves do not break in and steal.”

The Matt. 5-7 series included many diverse patterns and pictures—people, plants, flowers, stars, clouds, and butterflies, to name a few. One even had pig faces on it (“Do not cast your pearls before the swine”).

Wednesday, March 7, 2012

Paper Snowflakes

Ohio History
Light of the World
The final attraction at the Hayes Museum appeared at first to be a bunch of large snowflakes. They were created by a surgeon from Michigan named Thomas Clark. Otherwise known as “Dr. Snowflake,” he specializes in this intricate cut-paper art. Most of us have probably folded a circle in quarters and cut out little notches to make a snowflake. Well, Dr. Snowflake used the same technique to create an array of tiny pictures within an 8” or 10” paper circle. It was truly amazing!
There some Christmas-themed snowflakes and a few designs featuring the planets. But the largest collection was a series picturing Bible verses from Matthew 5, 6, and 7. This snowflake illustrates Matthew 5:14:
“You are the light of the world.
 A city that is set on a hill cannot be hidden.
Nor do they light a lamp and put it under a basket, but on a lampstand,
and it gives light to all who are in the house.”

Monday, March 5, 2012

Model Trains

Ohio History
Trains in the Village
Here’s a view of the other side of the layout with two passing trains. I think the one on the left ran on an interactive switch. It even has lights in the passenger cars! The short one with yellow cars is also in one of my previous pictures. Head over to J Beachy Photography if you want to see an extraordinary video of a model train in action. It’s really awesome, complete with scenery and music!

Sunday, March 4, 2012

Exploring the Trains

Ohio History
Ski Lift and Trolley Car
Besides watching the trains chugg around the tracks, we could also try out interactive buttons all over the layout. Some of them operated model trains on short sets of tracks. Others sent children’s swings, tiny ice skaters, and a carousel (with lights & music) into motion. We could even move the ski lift up and down a snowy mountain! Above you can see both the ski lift and a little trolley car (which got stuck every time we tried to run it!).
Railroad Crossing
Here is the little railroad crossing station. The door opens like this and the little man pops out when you press the button. I think it’s so cute!
Below is a scene with a lighted church, ice skaters (that lake is actually a mirror), and a train. Those cows in the background caught my eye—what on earth are they doing in the snow outside a hardware store?? 
Cows in the Snow


Saturday, March 3, 2012

Hayes Train Layout

Ohio History
Second & Third Levels
The train layout was fascinating to examine—countless tracks ran in every direction, through tunnels, railroad crossings, and stations! Green turf and plenty of cotton stuffing created the snowy backdrop for a village scene with miniature houses, shops, churches, and depots. Many were even lit by tiny electric lights. Did you spot the two trains coming ‘round the bend? I’ll tell you, it was a challenge to get all the moving trains lined up for a picture!
Trains and Village
The six large trains replicated actual styles in use during President Hayes’ time. Railroads were crucial during the Civil War and Mr. Hayes probably rode them frequently. I’d say that both of these look like passenger trains; what do you think?