Only the best from a bulletin board full of experience in such varied interests as poultry, art, good food, and Ohio history.
Come along on the adventure!

Be sure to also check out ohloveofgeocaching.com for travel and caching adventures!

Tuesday, November 29, 2011

Apple Pie

Gluten-Free Gourmet
Chopping Apples
And now, for the classic apple pie. Apples are a little high in sugar, but we find if we only have small servings occasionally, we can still enjoy apple pie. I like to use Gala apples in this recipe, as they’re softer and sweeter than Red or Golden Delicious. Combine in a saucepan and simmer til softened:
1 Gala apple, chopped in ½” slices                                     ¼ c. honey
1 t. cinnamon                                                                      ½ c. water
Beat separately and mix into apples:
2 eggs                                                                        1 t. vanilla extract
Pour into pre-baked pie shell (made from Basic Pie Crust recipe) and bake at 400° for 20 minutes. Cool and slice.
Apple Pie
You could also make a crumb topping by sprinkling a mixture of, say, ½ c. rolled oats, 2 T. honey, and ½ t. cinnamon over the pie before baking. Simply delicious!

Monday, November 28, 2011

Pumpkin Pie

Gluten-Free Gourmet
Holiday Treat
We couldn’t forget those wonderful Thanksgiving pies at this time of year! Here is an outstanding pumpkin pie using the same easy crust. To fill a regular-size pie shell, I suggest doing triple the recipe. For a mini-pie, combine in a bowl and beat well:
3/4 c. cooked, mashed fresh pumpkin, or 1/2 c. canned pumpkin
2 oz. soft cream cheese                   1/4 c. honey
1 t. cinnamon                                                    1 egg
2 t. vanilla                                                   Pinch salt
1/2 t. each ground cloves and nutmeg
Pour into crust and bake at 350° for 20 minutes, til browned and almost set. Cool and enjoy!

Sunday, November 27, 2011

Blueberry Pie

Gluten-Free Gourmet
Simmering Berries
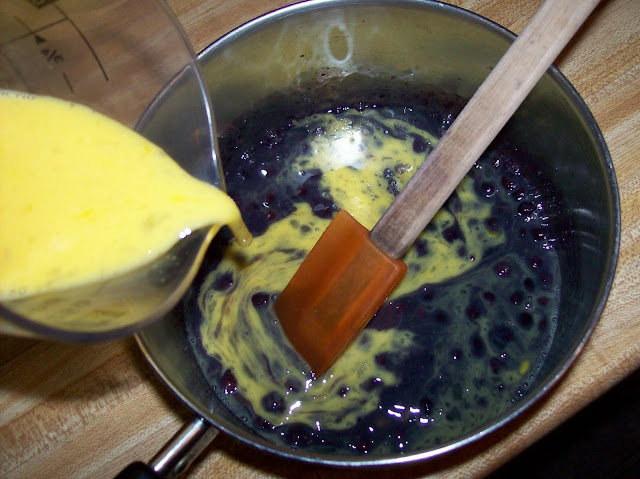
Yum...now let’s make some fillings for that pie crust. Blueberries are a great fruit since they’re low in sugar, high in fiber, and fit well in the little pies. First, simmer 1/2 c. frozen wild blueberries in 1/2 c. of water with 1/4 c. honey til the berries are softened and the mixture thickens. Removing from heat, mix in 1 t. vanilla extract and two well-beaten eggs. Pour into pie crust, dividing between bowls if necessary. 
Adding Eggs
Bake at 350° for 10-15 minutes until almost set in the center and lightly browned. Let cool a few minutes, loosen edges with a knife, and cut into mini pie slices. Serve with a fork and top with dallops of cream cheese (a good low-sugar sub for whipped cream).
Blueberry Pie

Saturday, November 26, 2011

Basic Pie Crust 2

Gluten-Free Gourmet
Spreading Pie Dough
This recipe makes use of a second strategy for desserts: a small serving goes a long way. That keeps the amount of grain at a tolerable level. This recipe would cover about a third of a regular pie pan. I like to use three small, oven-safe glass bowls to make mini-pies; you could also use a six-inch glass pan. It’s important to spread the dough quickly in the pan so it doesn’t thicken too much. Also, you can’t really spread it up the sides since it will fall back down in the oven. Next, bake the crust at 350° for 10 minutes before adding the filling.

Friday, November 25, 2011

Basic Pie Crust

Gluten-Free Gourmet
Pie Crust Ingredients
With all this trekking around, I’m getting really hungry! The holiday season brings delicious desserts, but if you remove the wheat flour, sugar, milk, and nuts from traditional pies, you don’t have much left! Happily, there is an alternative. Here is a wheat-free, no-sugar pie crust that can be whipped up in minutes.
In a small bowl, combine 1/2 c. sifted rice/oat flour, 1/2 t. salt, and 1 T. canola oil. Stir in 2-4 T. water til the dough is wet and spreadable, but not runny.

Thursday, November 24, 2011

Running the Furnace

Ohio History
Stockyard
Not far from the charging shed stood this huge storage structure, which held the ore, limestone, and coal for the furnace. In a year, Buckeye Furnace used 8,000 tons of iron ore, 400 tons of limestone, and 12,000 cords of wood (burned down to make charcoal to power the furnace).
Samples
Besides this big exploitation of natural resources, workers were also treated very poorly. What meager pay they received for the long, dangerous workdays was not even real money, but “scrip.” It could only be spent at the “company store,” owned by the iron master, which inflated prices for everything. Thus workers often owed the store for even their own food. Not a little unlike the Southern plantations of that time!

Wednesday, November 23, 2011

Furnace-Below

Ohio History
Casting Shed
Now we’re standing in the casting shed (lower left in the last picture) at the bottom of the furnace chimney. After twelve hours, the molten iron would be drawn from the furnace into the casting shed, where it flowed into pig molds shaped in the sand floor. Then a “slag wheel” pulled a chain across the hot iron’s surface to skim off impurities, or slag. Once cooled, the iron logs were floated down the creek to be shipped away on the nearest railroad and used in industry. In fact, iron from these furnaces was used for weapons, especially battleships, in the Civil War.

Tuesday, November 22, 2011

Furnace-Side View

Ohio History
Buckeye Furnace From Below
Here is the furnace from the lower level. The charging shed, up on top, held the hot blast oven (right-hand chimney) which heated water boilers inside to power the air compressor engine. Meanwhile, the furnace itself (below charging shed) was loaded with layer upon layer of ore, limestone, and charcoal. The engine then pumped extremely hot air—600°—into the metals for twelve straight hours to melt the iron from the ore. The black, charred wood on the shed testified to months of intense heat—imagine what it was like for the workers!

Monday, November 21, 2011

Buckeye Furnace

Ohio History
Charging Shed
Now we’re jumping forward in time about 600 years, to the discovery of abundant iron ore and limestone here in the “Hanging Rock Iron Region” of Ohio. Buckeye Furnace is one of the few remaining iron blast furnaces which supplied the nation’s growing iron needs in the 1800’s. New communities grew around these factories: workers’ houses, school, church, store, and the iron master’s mansion. Nearly all is gone now except for the lonely-looking furnace. This top view shows the charging shed, where the raw materials were taken in to be loaded into the chimney stack.

Saturday, November 19, 2011

Leo Trail 2

Ohio History
Up the Gorge
Heading back up the steep ravine, the trail did not improve much. But the rock sculptures, like the “pancakes” above, were still magnificent. One rocky shelf extended so far over the trail that we could stand in the deep cavern. It was hard to believe we weren’t at Old Man’s Cave, except that there was absolutely no one else around!!
Marble Rock
Isn’t it amazing to think a rock could hold such a spectacular mix of colors? We got a good look at it while we were underneath that rock shelf I mentioned. There were also rocks embedded with pebbles and flint, and some had a honeycomb pattern eroded from their surface. Really, it is a shame more people don’t know about this awesome gorge!

Friday, November 18, 2011

Leo Trail

Ohio History
Fern Rock
Here are some shots coming down into the gorge. The hike down over slippery rocks was quite treacherous, and we considered turning back. I’m glad we didn’t!! The fern cascading over the rock above was one of the first marvels we saw. Compared to the rock ledges we were descending, this boulder was small (say five feet high).
Stream Below
Finally, we’ve reached the very bottom of the gorge, trickling with a small stream. The rocky wall was simply awesome as it rose fifty or sixty feet above our heads! The stone surface was covered with ledges, holes, and pancake-like layers. Tree roots and vegetation dangled over the edge as if hanging on for dear life; it was amazing how much plant life was flourishing in the rugged environment.

Thursday, November 17, 2011

Leo Petroglyph Trail

Ohio History
Rocks in the Gorge
The engraved rock at Leo Petroglyph was not the only thing to admire. In fact, the sandstone bedrock was not only exposed here, but also in the steep gorge nearby. Magnificent rock outcroppings extended from colorful foliage high above the gurgling stream at the bottom of the narrow valley. Autumn trees contrasted with tall pines as we hiked down the slippery trail on the side of the gorge. Imagine the force of the Flood waters as they cut out these beautiful sculptures in the rocks!

Wednesday, November 16, 2011

Leo Petroglyph

Ohio History
Rock Carving
Now we’re back on windy roads into the rough, wooded hills of Jackson County. Our next stop was not a museum at all, just a large rock in the ground inside a picnic shelter. But this sandstone bedrock is very unusual, for on its surface are carved 37 prehistoric pictures, or petroglyphs. They are attributed to Fort Ancient Indians from about 700 years ago. Their purpose remains unknown—possibly tribal symbols or a pictographic history. Among the figures are birds, snakes, fish, human figures, and different kinds of footprints. The image above is unidentified: it looks something like a bird’s head and wings to me. What do you think?
Stone Fish

Monday, November 14, 2011

Peace Pipe

Ohio History
Tecumseh Peace Pipe
In 1807, a young leader named Tecumseh was rallying the Indian tribes to resist giving up land to white settlement. Fearing war, the governor asked Mr. Worthington for help (he was a trusted friend of the Indians). He brought Tecumseh and his men down to Adena for a week to talk peace, and when they left, the Indian gave him this tomahawk peace pipe. It’s now on display in the large Adena museum there at the estate.

Thomas Worthington's other political exploits included helping to write and ratify Ohio’s constitution so statehood could be achieved 1803. He went on to become U.S. Senator from 1803-07 and 1810-14, then Ohio governor from 1814-18. And, if that’s not enough, the picture on the Great Seal of Ohio is the view from the Adena hilltop across the river valley.

Sunday, November 13, 2011

Adena Gardens

Ohio History
Flower Garden
Our walk around the farm ended in the beautiful Adena gardens. Closest to the house were beds of all kinds of flowers, lined with geometric walkways. On this fall trip, the plants were dying back, but we visited again in the summer and saw some nice flowers.
Vegetable Garden
Nearby was the kitchen garden, with many different vegetables—squash, cukes, greens, beets, and beans. Servants would have been the ones who maintained the large garden which supplied all the family’s veggies. In the back of this picture is the third garden area: what is left of the arbor and its fruit trees. It certainly would be a lot of work to keep all this up!

Saturday, November 12, 2011

Tenant Quarters

Ohio History
McCormick Kitchen
Doesn’t this room look out of place on the Adena estate? It's an example of the tenant houses occupied by farm workers. The quarters were very modest--only two rooms and an upstairs. This one belonged to George McCormick, the resident cabinet-maker, who did all the woodworking in the Worthington home. He did an excellent job, as we saw several of his tables, bureaus, sideboards, and clock cases still in the mansion.

Friday, November 11, 2011

Adena Diorama

Ohio History
Farm Layout
Here is the entire Adena estate in detailed scale model. It’s hard to imagine that industrious plantation surrounded by wild forests (well, maybe not harder than today’s city buildings!). In front, we see the sheep pen, livestock barn, and grazing cattle. To the far right is a tenant house, and across the road the stable is being rebuilt...yes—for the fire insurance policy! In back are the mansion, servants’ quarters, smokehouse, etc., bordered by the gardens. Thomas Worthington owned land not only in Ross County, but also in Hocking and Madison (where we live!). He used the land for livestock, crops, sawmills, and gristmills.

Thursday, November 10, 2011

Adena Upstairs

Ohio History
Clay Bedroom
Then we ascended the stairs to the second floor of the mansion. The two children’s bedrooms were well separated from the guest rooms, as they would often entertain near strangers. The Henry Clay bedroom above is where Mr. and Mrs. Clay stayed on their yearly visit to Adena (they were cordial friends of the Worthingtons).

Monroe Bedroom
President James Monroe actually slept in this room when he stopped at Adena on a trip once. It is, by far, the fanciest room, with ornate wallpaper and its own fireplace. The three guest rooms held many other visitors as well—sometimes dozens would sleep here at a time!

Wednesday, November 9, 2011

Downstairs 2

Ohio History
Adena Parlor
Here are a few more photos from the Worthingtons’ beautiful home. This large parlor was mainly used for entertaining guests. The elaborate wallpaper design and unusual carpet sure created a grand presentation, along with floor-to-ceiling windows and draperies. The fireplace was even marble. And, add to that another dumb waiter in the corner!
Sitting Room
This pretty room was where Mrs. Worthington took her friends. She also used it as an office—she did the bookkeeping for Mr. Worthington's numerous farm enterprises. Like many rooms in the house, this one uses that brilliant shade of peach. Apparently pink paint was very expensive and thus the more you used, the wealthier you were!

Tuesday, November 8, 2011

Adena Downstairs

Ohio History
Adena Dining Room
Can you imagine seating yourself as a guest in this fancy table? The other downstairs rooms were just as fancy! The ornately-papered parlor and comfy sitting room entertained important guests, and the master bedroom opened to the garden in the back. Mr. Worthington’s study was located in one wing and a large kitchen was in the other. This picture can hardly be compared to the simple Rankin dining room; in the corner there’s even a dumb waiter which rotates to be loaded with food from the kitchen!

Monday, November 7, 2011

Adena Mansion

Ohio History
Worthington Estate
Well, I’d say it’s time to get started on another historical trip. This time we’ll head into the rustic hills and backwoods of southeastern Ohio. But first let’s stop in Chillicothe and see the Adena Mansion, home to an influential politician named Thomas Worthington. He helped write Ohio’s constitution and achieve statehood in 1803, and was governor from 1814-1818. But Mr. Worthington’s wealth came from capitalizing on the new state’s cheap land prices. Yes, even then, it took big money to get into politics!

Saturday, November 5, 2011

Coping with Heat

Backyard Poultry
Dust Baths
Summer temperatures tend to be the hardest on chickens; their feathers, little exposed skin, and active bodies only keep them warmer. The hens do pant like a dog and hold their wings away from their bodies to let out heat. And then they take dust baths. The chickens work cool dirt up into their feathers, rubbing away oils and grease, and then shake it all out. A good preening makes the feathers nice and shiny.
Wet Sheet
We also read about hanging a wet sheet up to make a cool breeze. The only thing was that it had to be sprayed every half hour to keep it wet on ninety-degree days. This proved to be quite effective, though, and the chickens never seemed to suffer from the heat.
Lentil Treat
The last strategy is giving extra treats. This not only distracts them, but also helps the hens get enough protein when the heat discourages them from eating. We used mash (wet feed), rolled oats, and cooked lentils—and our chickens sure were spoiled! You can see here they are greedily gobbling it up!

Wednesday, November 2, 2011

New Chicken Run

Backyard Poultry
Exploring the Pen
Eventually it dawned on us that one run was not going to be enough for eight hens and one very big rooster. Also, the run’s weight was getting to us. So, we set out to build a very light run that could join to the first for more space. By cutting down 2x4s to 1x2s, using corner braces for supports, and replacing one-inch wire with two-inch, we cut the weight down by more than half.
Completed Frame
This is what the assembled frame, measuring three feet by six feet, looked like without the wire. The corner braces made the structure quite sturdy. You can see the door on the end which slides in and out. This proved to be a good design and we built several more like it.
Inspectors
Now we see what the chickens think of it. They were always very cautious of anything new, but soon they began to really enjoy running in and out of the door between the runs. Here we see Acorn trying out the new doorstep. The Rhode Island Red in front was later named Cherry; it was one of Puzzle’s favorite hens.