Only the best from a bulletin board full of experience in such varied interests as poultry, art, good food, and Ohio history.
Come along on the adventure!

Be sure to also check out ohloveofgeocaching.com for travel and caching adventures!

Friday, February 28, 2014

Golden Buff Chicks

Backyard Poultry
Eyeing the Camera
Now let me run through the different breeds I acquired in this batch of chicks. I had branched out to four different breeds this year: Barred Rocks, Rhode Island Reds, Buff Orpingtons, and Araucanas. So where, you may ask, do the Golden Buffs come in? Well, when I arrived at the feed store to pick up my chicks, I was told that the ten Rhode Island Reds did not hatch (?) and so I was sent Golden Buffs as a substitute. I decided to reorder six of the Reds, and keep four of the Golden Buffs as an experiment. It never hurts to try a new breed! In fact, it became one of my favorite breeds. In the top photo, a Golden Buff enjoys its outing from the brooder box. Yes, somebody is holding two Barred Rock chicks singlehandedly in the background.
Golden Buff
I never fail to admire the striped pattern on the Golden Buff chicks. Sadly, it is lost with the down feathers, to be replaced with a mess of white and brown. Golden Buffs are actually a cross between the Rhode Island Red and the White Plymouth Rock. They inherit the spunk and excellent egg laying from the RI Red, and the gentler nature and stockier build of the White Rock. In essence, positive plus positive traits. Thus, the Golden Buffs and related Golden Comets have become the mainstay for egg-producing operations.

Wednesday, February 26, 2014

First Greens

Backyard Poultry
Snowflake the Brave
I was all too anxious for my new biddies to develop the taste for greens. They were no more than a week old when I first introduced greens in the brooder box. The chicks were very cautious at first, and kept their distance from the feared human hand. Only one Barred Rock chick, which came to be known as Snowflake, had the spunk to run up and sample whatever we put in. I think Snowflake became the guinea pig for the other chicks, since as soon as safety was apparent, the rush began!
Salad Bar
Soon all the chicks were pushing and squirming for a bite of the delicious green leaves. Dandelion leaves, chickweed, and clover were among their favorites. Chopped very small, of course, and held very still, in a hand that promised not to snatch up a chick in the action! It was so fun to feel the tiny, warm down feathers rubbing against my fingers as the chicks jostled and climbed over each other.
Predictably, some 'specialists' claim that chicks should be fed chick/grower feed only until they're almost grown hens. Only then can they be exposed to the dangerous bacteria and other various hazards of the outdoors. Somehow, every one of my chicks survived the daily 'dose of danger' from my backyard! Of course, you should be reasonably careful--never feed greens from chemical-treated lawns or poisonous plants.

Monday, February 24, 2014

First Adventure

Backyard Poultry
Checking It Out
Gradually the chicks warmed up to us, and got the most from their little outings. We in turn tried to make the box like home, with litter, woodshavings, and even a waterer. They loved climbing inside the quart container in the far corner to peck at the food pellets. Of course, most of the food ended up scratched out into the litter. The chicks got cold quickly, and would huddle up and almost fall asleep, such as the Araucana chick on the lower right in the bottom picture. One of us would quickly scoop up the little chick and warm it in our hands. 
Adventure
It wasn't long before they learned how to climb out of the box and run across the brooder box cover. I wonder if that thought is crossing those chicks' minds right now? Before long they'll be big enough to half fly, half climb over the edge. Now that's trouble!

Sunday, February 23, 2014

Out of the Box

Backyard Poultry
Feeding Chicks
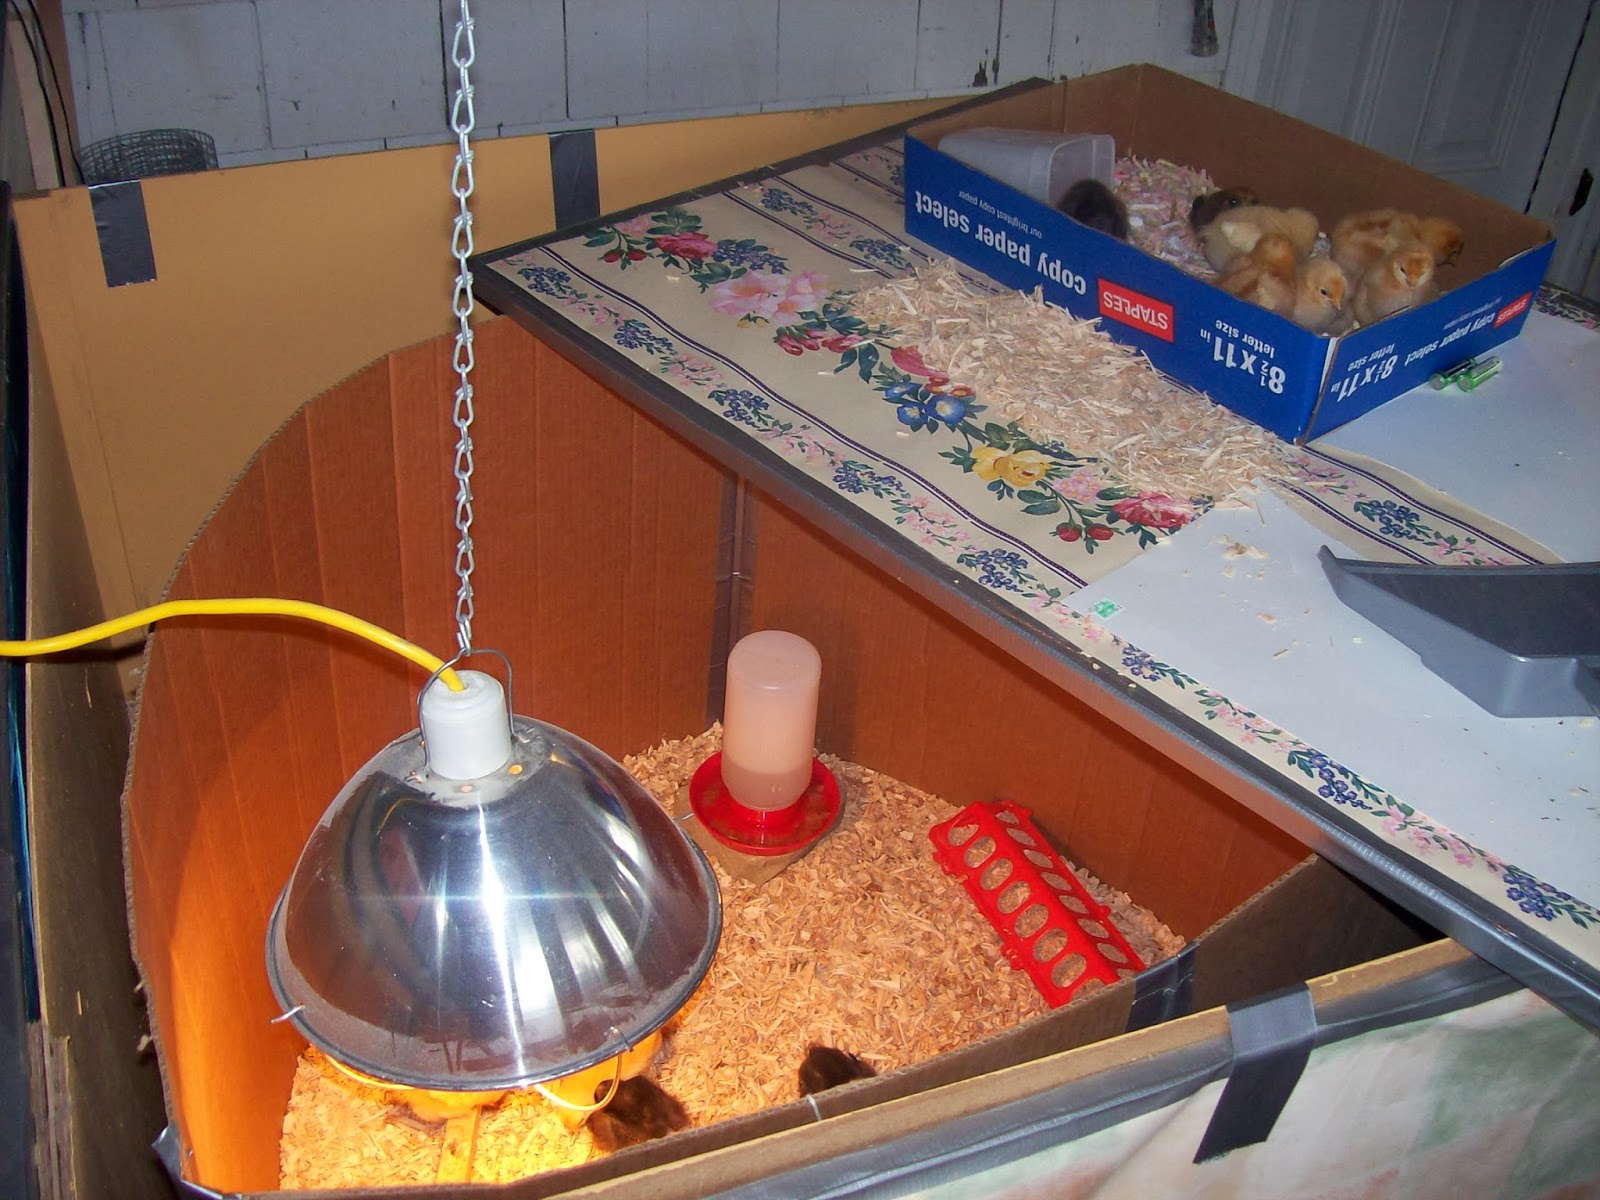
The one disadvantage to such stream-lined housing was that we didn't have to have as much contact with the chicks. The box was too deep to see the chicks very well, and was so big it could not be kept in the kitchen. Of course my sister and I were always fishing out a couple chicks at a time to cuddle (until called inside to finish our chores). But even between two people it's hard to hold twenty chicks at once. So we developed a system of getting three or four chicks out at a time to run around in a small box set on top of the brooder. We tried to interest them with feed or snipped-up greens, but they still seemed pretty lost up there in the big wide world.
Where's My Mommy?

Friday, February 21, 2014

Brooder Box

Backyard Poultry
Housing Renovations
Our chick raising experience this second year could not have been more different from the first. Year 1: dusty litter smelling up the kitchen; construction of a housing addition (ie cardboard box + duct tape) every other day; feed either messed up with droppings or shoveled out and wasted; all ten chicks hauled out every day to remove dirtied litter. Yes, an experience not to be compared (or repeated). Well, the photo above may not look much different, but believe me, it is.

We started by building a real box, using plywood panels framed by wood stakes. It was generously large, about 4'x4', and the bottom was covered waterproofed with sheet plastic. The best feature was that one wall was hinged, so it could fold down flat to shovel out old litter. It was a breeze to clean out! Then I made a 'brooder guard' from a long piece of cardboard taped into a circle. This kept the young chicks in a small area directly under the light, and could be expanded and removed as they grew bigger. Yes, expandable housing. As a final touch, we used a piece of Styrofoam insulation as a cover on top to regulate the temperature inside this cozy brooder box.

Wednesday, February 19, 2014

Sleeping on the Job

Backyard Poultry
Naptime - Someone's Peeking!
If there's one thing that all chicks do, it's sleep. It was a matter of minutes after being let go into the brooder before all my chicks were asleep. It was so funny to watch -- they just collapsed in whatever position they happened to be in, spreading out their little wings under the radiance of the heat lamp. They piled onto each other like pillows, sliding down and then jerking their heads up, only to slide down again. The chick that ended up on the bottom would only open its eyes for a second, too tired to move away. I guess they'd been through a lot in their first day of life.
Did you spot the chick peeking in the photo above? That's Birchie, one of the three Easter egg layers we got. 
Three in the (Rock) Bed
What an unusual place to sleep! As the chicks grew, I raised the waterers up higher. Not only were the chicks taller now, but their feet were amazingly adept at shoveling litter into a ground-level water trough. I used flat pieces of cement or rocks to lift up the water containers. Well, every day I had to empty, rinse, and refill the water containers. Of course I left the rocks in the brooder. I wasn't gone more than five minutes, but returned to find three chicks asleep on the rock! I think it must have absorbed the heat lamp's radiance and felt nice and warm to those three little chicks.

Tuesday, February 18, 2014

Brooder

Backyard Poultry
Chicks' First Home
Unlike my first year of chick raising, I came quite prepared for the second challenge. I purchased a large, covered feeder instead of the shallow tin troughs from before (which spill, slide, and even tip over). I had plenty of dry wood shavings to use as litter (much more absorbent than straw) and an expandable brooder box (post about that soon). It went much more smoothly than the first year, which you can read about, starting here. Maybe you noticed the chick feed sprinkled over the paper towel in the photo above. It encourages the new chicks to start eating, by putting the food where they can scratch - and sleep - in it.

Sunday, February 16, 2014

First Drink

Backyard Poultry
Finding the Water
The most important thing when you bring day-old chicks in the door is water. Chicks can live from 24-48 hours on the nutrients in the egg after they hatch. By the time they've been dried off from hatching, boxed up, mailed and/or delivered to the feed store, and picked up by you, much of that time has probably already elapsed. So getting rehydrated is a top priority. It takes a tender hand to pick up each little bird, place a finger under its "chin" and a thumb on its head, and dunk its little beak into water. Imagine doing this for a batch of 50 or 100 broiler chicks! There's no getting around it though, since chicks may not figure out for themselves where the water is, and it's not always obvious if some chicks aren't drinking.
Water Line
It's also very important to use a chick-sized waterer at this age (I have a one-quart size). This is because chicks can easily fall into a larger water trough and, unable to swim like ducklings, will drown if not caught in time. Of course, this too could be inconvenient with a large batch of chicks: having to fill half a dozen one-quart waterers twice a day!


Saturday, February 15, 2014

New Chicks

Backyard Poultry
Day-Old Chicks 
Despite the blizzardy weather outdoors, the time of year has come to begin planning for the spring -- tilling the garden, planting flowerbeds, catching up on outdoor repairs, and, of course, raising chicks. Can you guess which was uppermost on my list three years ago? The chicken chronicles so far published on my blog have covered only one year of poultry ups and downs (yes, I can hardly believe it). Of course, achieving temporary peace in the hen house was not enough, and I had to plunge into a new chicken adventure! With much planning and deliberation, I decided to add 20 new chicks to my flock. It was a chilly day in April that we went to the feed store to pick up the little peeping birds. I expanded my selection of breeds with this addition, which I will be describing soon. There isn't anything in the world quite like day-old chicks.

Friday, February 14, 2014

Silver Heart Bracelet

Do-It-Yourself Decorating
Red, Red-Orange, Orange
Last but not least, here is a very unique statement. In fact, it combines beads from at least two other bracelets I've featured (did you spot the blue hearts and the red teardrops?). Those maroon ones almost look like jelly beans! They have an interesting competition with the smaller 'focal point' orange bead. The red teardrops? . . . No comment. Somehow the bracelet does hold its conflicting parts together though. The silver heart shape is repeated by the blue hearts, which in turn are repeated by the blue round beads, which lead your eye back to the focal point. As you can tell, I did not personally string this bracelet, but it is evident there are no boundaries to what you can try with beaded jewelry!

Wednesday, February 12, 2014

Green Bracelets

Do-It-Yourself Decorating
Pink and Green
Speaking of color schemes, here are two different bracelets made from the same colors. My sister likes this shade of spring green and had a lot of green beads on hand. She chose red and light pink to compliment the green and took off from there.
The left-hand bracelet began with green hearts separated by small pink beads. The three red-flowered beads are really unusual - each one is like a red cylinder bead overlaid with flat pink flowers and covered in a clear round ball. They picked up the pink as well as the flat red beads she used. The silver heart-shaped clasp my sister found adds a personal touch.
The right-hand bracelet, on the other hand, takes a whole different tack. It uses a cylindrical green bead covered in flowers for the focal point. Light pink and coral beads intersperse with the spring green spheres. The red teardrops bring almost an iridescent glow in contrast to the little brown beads at their bases. Contrast is the word for this bracelet - red and green, diamonds and circles, flat and round. I'd call it heavier and sharper compared to other flowery bracelet. Which one do you like better?

Monday, February 10, 2014

Purple & Pink

Do-It-Yourself Decorating
Formal Bracelets
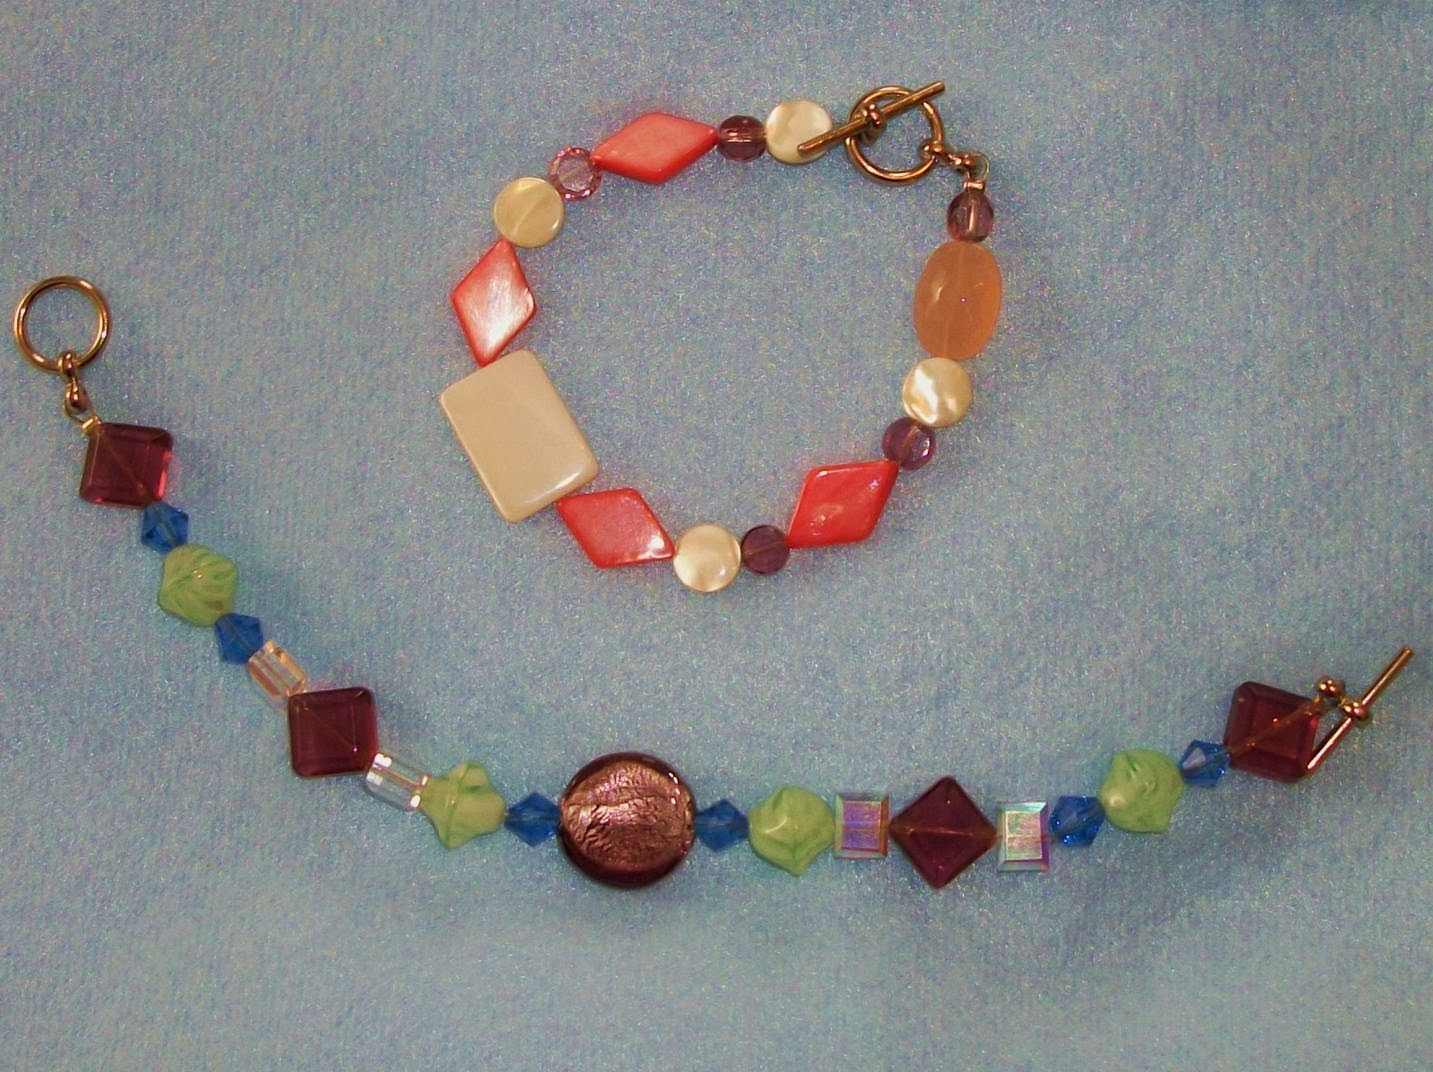
I like to wear these two dainty bracelets with dress clothes. For the top bracelet, I chose coral pink diamonds and round white beads. The purple circle beads created an interesting color combination. I used a matching white rectangular bead as the focal point. You have a choice when making a bracelet: you can either create an even pattern of beads, or you can build up the beads symmetrically to a central focal point bead. I decided on a focal point for both of these bracelets. 
A large, glitzy plum-colored bead created the focus for the purple bracelet. It's always good to have a color scheme in mind so you don't end up with a dozen different colors. I thought purple and green would be good for this bracelet. I found purple diamonds to match the central bead, separated by little blue diamonds. The mint beads are very unique, with their swirled, convex pattern. Finally, the rectangular, chisel-edged clear beads add an ornate touch.

Saturday, February 8, 2014

Blue Flower Bracelet

Do-It-Yourself Decorating
Blue and Orange
This bracelet has a much different feel than the last one. Large blue beads covered with opaque blue flowers are the focal points. Matching blue oval beads repeat the color, while rusty red seed beads create an interesting contrast. If you look closely, there are also some rust-colored spacers in between the other beads. I'm pretty sure my sister put this bracelet together, and you can see her tastes are a bit different from mine!

Friday, February 7, 2014

Heart Bracelet

Do-It-Yourself Decorating
Bracelet #1
Now let's get back to making jewelry! I think I've covered all the steps for making your own beaded jewelry, so now I'll show you a few hand-made bracelets. The one above is my favorite from all the bracelets I've made. I started with the translucent blue heart beads, and added matching blue ovals. I thought it needed some brighter color accents and the coral pink seemed just the right fit. The interesting shapes of the opaque white beads made a nice filler. I used the clear diamonds to accent the center pink bead. I almost wish now I had used the diamond beads for all the filler beads - it would have been a lighter and more delicate look.

Wednesday, February 5, 2014

Italian Salad

Gluten-Free Gourmet
Green Salad
Here is a fresh green salad to brighten up your day. When this cold winter weather keeps you shut indoors, fresh vegetables are especially important to replace nutrients that come from sunshine.
Feel free to substitute your favorite veggies with any of my ingredients. I exchanged tomatoes and pimientos for the mushrooms and peppers in the original recipe, and added cheese and raisins for variety. I like the mixture of sweet and sour flavors in this Italian-style salad. It's really easy to throw together. Here's how:
Combine in a large salad bowl:
1 head green or Romaine lettuce, soaked in ice water and cut in bite-size pieces
1/2 c. frozen green beans, blanched for 3 minutes
1 small head broccoli florets, torn in bite-size pieces and blanched for 1 minute
1/2 c. cheddar or Colby cheese, cut in 1" squares, 1/4" thick
1 - 2 Roma tomatoes, cut in julienne strips
1/4 c. raisins                               1 T. diced pimientos
For the salad dressing, combine in a jar and shake well:
1/4 c. olive oil                1/4 c. canola oil
2 t. mustard                          2 t. honey
1t. basil                          1/2 t. oregano
1 t. red wine vinegar or balsamic vinegar
Pour over salad and refrigerate for a half hour or so to allow flavors to develop. Serve in salad bowls and garnish with fresh basil or parsley, if desired. The salad is a great compliment for a steaming bowl of soup, perfect for a cold winter day!

Monday, February 3, 2014

Daffy Duck

Backyard Poultry
Duck Trio
Daffy grew up so quickly. The Pekin liked to herd the two Khakis around, alternately looking after them and bossing them around. It was a funny sight to see Daffy waddling around the yard. As it was growing up, one of Daffy's wings became lopsided. We were afraid it would not correct itself. But we learned from experience that Daffy liked our small patch of comfrey in the herb bed. (It could devour the whole bed if left unattended.) We fed it several leaves almost every day and by the time Daffy was full-grown, its wing looked perfectly normal.
Daffy
Daffy was a beautiful duck. Its full array of feathers were such a pure white. Each one lay in place despite Daffy's constant waddling. However, the duck loved to use its big bill for digging mud holes in the yard. Of course all the mud did not stay in the hole, and Daffy's perfect color was soon messed up with brown spots. At this point, Daffy would stand in the yard and quack for somebody to fill the pool with fresh water so it could take a bath. A half hour and much splashing later, Daffy would emerge with feathers almost as white as before. After preening its feathers to a shine, the duck would go looking for more mud holes to dig.
On the Nest
Daffy took egg-laying very seriously. It insisted on having a giant pile of fresh straw before settling down to business. The duck created an amazing nest with its webbed feet - even a chicken would be impressed. It was always exciting to find a large white egg in the middle of the straw!

We really miss our trio of ducks. Nothing can replace the unique combination that adorned our yard for the last two years. Piney, Cocoa, and Daffy brought so much happiness and excitement as they grew from furry balls to beautiful ducks. It seemed they had a new adventure or discovery every day. My sister wants to give a special thanks to our brother for his dedication and help with caring for our ducks. This project was my brother's and sister's and they proved to be excellent duck keepers.

Saturday, February 1, 2014

Cocoa & Piney

Backyard Poultry
Khaki Campbells
Cocoa and Piney, the two smaller ducks, were now full grown at 4 pounds each. They were noticeably more active and faster than Daffy because of their long legs and slim bodies. Being a Pekin meat duck, Daffy was, well, chubby. The Khakis would quickly move off into the yard, as Daffy stood quacking "wait for me!" Of course, they paid no attention. When they were finally reunited, Daffy would scold them good-naturedly with a good deal more quacking.
Grazing
The Khaki Campbells were like twins and always stuck together, both chasing the same bugs and grazing the same spot of grass. They loved to roam the yard with their heads down and necks outstretched. It was so funny to watch one running in a zigzag pattern after a bug or moth! The ducks had become more shy now, running and flapping when we tried to catch them. Piney was the friendliest one of the Khakis, and did seem to enjoy having its soft down feathers stroked.
Pool
The one place Daffy had an advantage was in the pond. Having almost outgrown the little kiddie pool, Daffy allowed one duck at most in with it at a time. Piney, being the most gentle and smallest of the trio, was usually the one to be expelled from the pool. It stood patiently watching Cocoa swim with Daffy, and jumped in as soon the Pekin climbed out.